Html тег
Содержание:
- Input Restrictions
- Attribute Values
- Hoverable inputs
- Animated Inputs
- Select Options
- Form Elements in a Grid
- Grid with Labels
- Input Type Submit
- Attributes
- Input Type Date
- HTML Tags
- Input Cards
- Header
- Colored Labels
- Rounded Borders
- Borderless Input
- Input Form
- Hoverable inputs
- Animated Inputs
- Select Options
- Form Elements in a Grid
- Grid with Labels
- HTML Tags
- HTML Tutorial
- Further checks
- Input Type Hidden
- Animated Inputs
- Select Options
- Form Elements in a Grid
- Grid with Labels
- Значение атрибута type: tel
- HTML Tags
- Invalidating the input
- HTML Reference
- HTML Tags
- Input Type Reset
Input Restrictions
Here is a list of some common input restrictions:
| Attribute | Description |
|---|---|
| checked | Specifies that an input field should be pre-selected when the page loads (for type=»checkbox» or type=»radio») |
| disabled | Specifies that an input field should be disabled |
| max | Specifies the maximum value for an input field |
| maxlength | Specifies the maximum number of character for an input field |
| min | Specifies the minimum value for an input field |
| pattern | Specifies a regular expression to check the input value against |
| readonly | Specifies that an input field is read only (cannot be changed) |
| required | Specifies that an input field is required (must be filled out) |
| size | Specifies the width (in characters) of an input field |
| step | Specifies the legal number intervals for an input field |
| value | Specifies the default value for an input field |
You will learn more about input restrictions in the next chapter.
The following example displays a numeric input field, where you can enter a
value from 0 to 100, in steps of 10. The default value is 30:
Example
<form> <label for=»quantity»>Quantity:</label> <input
type=»number» id=»quantity» name=»quantity» min=»0″ max=»100″ step=»10″
value=»30″></form>
Attribute Values
| Value | Description |
|---|---|
| button | Defines a clickable button (mostly used with a JavaScript to activate a script) |
| checkbox | Defines a checkbox |
| color | Defines a color picker |
| date | Defines a date control (year, month, day (no time)) |
| datetime-local | Defines a date and time control (year, month, day, time (no timezone) |
| Defines a field for an e-mail address | |
| file | Defines a file-select field and a «Browse» button (for file uploads) |
| hidden | Defines a hidden input field |
| image | Defines an image as the submit button |
| month | Defines a month and year control (no timezone) |
| number | Defines a field for entering a number |
| password | Defines a password field |
| radio | Defines a radio button |
| range | Defines a range control (like a slider control) |
| reset | Defines a reset button |
| search | Defines a text field for entering a search string |
| submit | Defines a submit button |
| tel | Defines a field for entering a telephone number |
| text | Default. Defines a single-line text field |
| time | Defines a control for entering a time (no timezone) |
| url | Defines a field for entering a URL |
| week | Defines a week and year control (no timezone) |
Hoverable inputs
The w3-hover-color classes adds a background color to the input field on mouse-over:
Example
<input class=»w3-input w3-hover-green» type=»text»><input class=»w3-input
w3-border w3-hover-red» type=»text»><input class=»w3-input
w3-border w3-hover-blue» type=»text»>
Animated Inputs
The w3-animate-input class transforms the width of an input field to 100% when it gets focus:
Example
<input class=»w3-input w3-animate-input»
type=»text» style=»width:30%»>
Example
<input class=»w3-check» type=»checkbox» checked=»checked»>
<label>Milk</label><input class=»w3-check»
type=»checkbox»><label>Sugar</label>
<input class=»w3-check» type=»checkbox» disabled>
<label>Lemon (Disabled)</label>
Example
<input class=»w3-radio» type=»radio» name=»gender» value=»male» checked>
<label>Male</label><input class=»w3-radio»
type=»radio» name=»gender» value=»female»><label>Female</label><input class=»w3-radio»
type=»radio» name=»gender» value=»» disabled><label>Don’t know (Disabled)</label>
Select Options
Example
<select class=»w3-select» name=»option»> <option value=»» disabled
selected>Choose your option</option> <option value=»1″>Option
1</option> <option value=»2″>Option 2</option> <option
value=»3″>Option 3</option></select>
Example
<select class=»w3-select w3-border» name=»option»>
Form Elements in a Grid
In this example, we use W3.CSS’ Responsive Grid System to make the inputs appear on the same line (on smaller screens, they will stack horizontally with 100% width).
You will learn more about this later.
Example
<div class=»w3-row-padding»> <div class=»w3-third»>
<input class=»w3-input w3-border» type=»text» placeholder=»One»>
</div> <div class=»w3-third»> <input
class=»w3-input w3-border» type=»text» placeholder=»Two»> </div>
<div class=»w3-third»> <input class=»w3-input
w3-border» type=»text» placeholder=»Three»> </div></div>
Grid with Labels
Example
<div class=»w3-row-padding»> <div class=»w3-half»>
<label>First Name</label> <input
class=»w3-input w3-border» type=»text» placeholder=»Two»> </div>
<div class=»w3-half»> <label>Last
Name</label> <input class=»w3-input
w3-border» type=»text» placeholder=»Three»> </div></div>
❮ Previous
Next ❯
Input Type Submit
defines a button for
submitting form data to a form-handler.
The form-handler is typically a server page with a script for processing
input data.
The form-handler is specified in the form’s
attribute:
Example
<form action=»/action_page.php»> <label for=»fname»>First
name:</label><br> <input type=»text» id=»fname» name=»fname»
value=»John»><br> <label for=»lname»>Last name:</label><br>
<input type=»text» id=»lname» name=»lname» value=»Doe»><br><br>
<input type=»submit» value=»Submit»></form>
This is how the HTML code above will be displayed in a browser:
If you omit the submit button’s value attribute, the button will get a default text:
Example
<form action=»/action_page.php»> <label for=»fname»>First
name:</label><br> <input type=»text» id=»fname» name=»fname»
value=»John»><br> <label for=»lname»>Last name:</label><br>
<input type=»text» id=»lname» name=»lname» value=»Doe»><br><br>
<input type=»submit»></form>
Attributes
| Attribute | Value | Description |
|---|---|---|
| accept |
file_extension audio/* video/* image/*media_type |
Specifies a filter for what file types the user can pick from the file input dialog box (only for type=»file») |
| alt | text | Specifies an alternate text for images (only for type=»image») |
| autocomplete | on off |
Specifies whether an <input> element should have autocomplete enabled |
| autofocus | autofocus | Specifies that an <input> element should automatically get focus when the page loads |
| checked | checked | Specifies that an <input> element should be pre-selected when the page loads (for type=»checkbox» or type=»radio») |
| dirname | inputname.dir | Specifies that the text direction will be submitted |
| disabled | disabled | Specifies that an <input> element should be disabled |
| form | form_id | Specifies the form the <input> element belongs to |
| formaction | URL | Specifies the URL of the file that will process the input control when the form is submitted (for type=»submit» and type=»image») |
| formenctype | application/x-www-form-urlencoded multipart/form-data text/plain |
Specifies how the form-data should be encoded when submitting it to the server (for type=»submit» and type=»image») |
| formmethod | getpost | Defines the HTTP method for sending data to the action URL (for type=»submit» and type=»image») |
| formnovalidate | formnovalidate | Defines that form elements should not be validated when submitted |
| formtarget | _blank _self _parent _topframename |
Specifies where to display the response that is received after submitting the form (for type=»submit» and type=»image») |
| height | pixels | Specifies the height of an <input> element (only for type=»image») |
| list | datalist_id | Refers to a <datalist> element that contains pre-defined options for an <input> element |
| max | number date |
Specifies the maximum value for an <input> element |
| maxlength | number | Specifies the maximum number of characters allowed in an <input> element |
| min | number date |
Specifies a minimum value for an <input> element |
| minlength | number | Specifies the minimum number of characters required in an <input> element |
| multiple | multiple | Specifies that a user can enter more than one value in an <input> element |
| name | text | Specifies the name of an <input> element |
| pattern | regexp | Specifies a regular expression that an <input> element’s value is checked against |
| placeholder | text | Specifies a short hint that describes the expected value of an <input> element |
| readonly | readonly | Specifies that an input field is read-only |
| required | required | Specifies that an input field must be filled out before submitting the form |
| size | number | Specifies the width, in characters, of an <input> element |
| src | URL | Specifies the URL of the image to use as a submit button (only for type=»image») |
| step | numberany | Specifies the interval between legal numbers in an input field |
| type | button checkbox color date datetime-local file hidden image month number password radio range reset search submit tel text time url week |
Specifies the type <input> element to display |
| value | text | Specifies the value of an <input> element |
| width | pixels | Specifies the width of an <input> element (only for type=»image») |
Input Type Date
The is used for input fields that should contain a date.
Depending on browser support, a date picker can show up in the input field.
Example
<form> <label for=»birthday»>Birthday:</label> <input
type=»date» id=»birthday» name=»birthday»></form>
You can also use the and attributes to add restrictions to dates:
Example
<form> <label for=»datemax»>Enter a date before
1980-01-01:</label> <input type=»date» id=»datemax» name=»datemax»
max=»1979-12-31″><br><br> <label for=»datemin»>Enter a date after
2000-01-01:</label> <input type=»date» id=»datemin» name=»datemin»
min=»2000-01-02″></form>
HTML Tags
<!—><!DOCTYPE><a><abbr><acronym><address><applet><area><article><aside><audio><b><base><basefont><bdi><bdo><big><blockquote><body><br><button><canvas><caption><center><cite><code><col><colgroup><data><datalist><dd><del><details><dfn><dialog><dir><div><dl><dt><em><embed><fieldset><figcaption><figure><font><footer><form><frame><frameset><h1> — <h6><head><header><hr><html><i><iframe><img><input><ins><kbd><label><legend><li><link><main><map><mark><meta><meter><nav><noframes><noscript><object><ol><optgroup><option><output><p><param><picture><pre><progress><q><rp><rt><ruby><s><samp><script><section><select><small><source><span><strike><strong><style><sub><summary><sup><svg><table><tbody><td><template><textarea><tfoot><th><thead><time><title><tr><track><tt><u><ul><var><video>
Input Cards
Header
Example
<div class=»w3-card-4″><div class=»w3-container
w3-green»> <h2>Header</h2></div><form class=»w3-container»><label>First Name</label><input class=»w3-input»
type=»text»>
<label>Last Name</label><input class=»w3-input»
type=»text»></form></div>
Colored Labels
Use any of the w3-text-color classes to color your labels:
Example
<form class=»w3-container»><label
class=»w3-text-blue»><b>First Name</b></label>
<input class=»w3-input w3-border» type=»text»>
<label
class=»w3-text-blue»><b>Last Name</b></label>
<input class=»w3-input w3-border» type=»text»><button class=»w3-btn
w3-blue»>Register</button> </form>
Add the w3-border class to create bordered inputs:
Example
<input class=»w3-input w3-border»
type=»text»>
Rounded Borders
Use any of the w3-round classes to create rounded borders:
Example
<input class=»w3-input w3-border w3-round»
type=»text»><input class=»w3-input w3-border
w3-round-large»
type=»text»>
Borderless Input
The w3-input class has a bottom border by default. If you want a borderless input, add the w3-border-0 class:
Example
<form class=»w3-container w3-light-grey»> <label>First
Name</label> <input class=»w3-input w3-border-0″ type=»text»> <label>Last Name</label> <input class=»w3-input
w3-border-0″ type=»text»></form>
Input Form
Example
<div class=»w3-container w3-teal»> <h2>Input Form</h2></div><form class=»w3-container»> <label class=»w3-text-teal»><b>First Name</b></label>
<input class=»w3-input w3-border w3-light-grey» type=»text»> <label class=»w3-text-teal»><b>Last Name</b></label>
<input class=»w3-input w3-border w3-light-grey» type=»text»> <button class=»w3-btn w3-blue-grey»>Register</button></form>
Hoverable inputs
The w3-hover-color classes adds a background color to the input field on mouse-over:
Example
<input class=»w3-input w3-hover-green» type=»text»><input class=»w3-input
w3-border w3-hover-red» type=»text»><input class=»w3-input
w3-border w3-hover-blue» type=»text»>
Animated Inputs
The w3-animate-input class transforms the width of an input field to 100% when it gets focus:
Example
<input class=»w3-input w3-animate-input»
type=»text» style=»width:30%»>
Example
<input class=»w3-check» type=»checkbox» checked=»checked»>
<label>Milk</label><input class=»w3-check»
type=»checkbox»><label>Sugar</label>
<input class=»w3-check» type=»checkbox» disabled>
<label>Lemon (Disabled)</label>
Example
<input class=»w3-radio» type=»radio» name=»gender» value=»male» checked>
<label>Male</label><input class=»w3-radio»
type=»radio» name=»gender» value=»female»><label>Female</label><input class=»w3-radio»
type=»radio» name=»gender» value=»» disabled><label>Don’t know (Disabled)</label>
Select Options
Example
<select class=»w3-select» name=»option»> <option value=»» disabled
selected>Choose your option</option> <option value=»1″>Option
1</option> <option value=»2″>Option 2</option> <option
value=»3″>Option 3</option></select>
Example
<select class=»w3-select w3-border» name=»option»>
Form Elements in a Grid
In this example, we use W3.CSS’ Responsive Grid System to make the inputs appear on the same line (on smaller screens, they will stack horizontally with 100% width).
You will learn more about this later.
Example
<div class=»w3-row-padding»> <div class=»w3-third»>
<input class=»w3-input w3-border» type=»text» placeholder=»One»>
</div> <div class=»w3-third»> <input
class=»w3-input w3-border» type=»text» placeholder=»Two»> </div>
<div class=»w3-third»> <input class=»w3-input
w3-border» type=»text» placeholder=»Three»> </div></div>
Grid with Labels
Example
<div class=»w3-row-padding»> <div class=»w3-half»>
<label>First Name</label> <input
class=»w3-input w3-border» type=»text» placeholder=»Two»> </div>
<div class=»w3-half»> <label>Last
Name</label> <input class=»w3-input
w3-border» type=»text» placeholder=»Three»> </div></div>
❮ Previous
Next ❯
HTML Tags
<!—><!DOCTYPE><a><abbr><acronym><address><applet><area><article><aside><audio><b><base><basefont><bdi><bdo><big><blockquote><body><br><button><canvas><caption><center><cite><code><col><colgroup><data><datalist><dd><del><details><dfn><dialog><dir><div><dl><dt><em><embed><fieldset><figcaption><figure><font><footer><form><frame><frameset><h1> — <h6><head><header><hr><html><i><iframe><img><input><ins><kbd><label><legend><li><link><main><map><mark><meta><meter><nav><noframes><noscript><object><ol><optgroup><option><output><p><param><picture><pre><progress><q><rp><rt><ruby><s><samp><script><section><select><small><source><span><strike><strong><style><sub><summary><sup><svg><table><tbody><td><template><textarea><tfoot><th><thead><time><title><tr><track><tt><u><ul><var><video>
HTML Tutorial
HTML HOMEHTML IntroductionHTML EditorsHTML BasicHTML ElementsHTML AttributesHTML HeadingsHTML ParagraphsHTML StylesHTML FormattingHTML QuotationsHTML CommentsHTML Colors
Colors
RGB
HEX
HSL
HTML CSSHTML Links
Links
Link Colors
Link Bookmarks
HTML Images
Images
Image Map
Background Images
The Picture Element
HTML Tables
HTML Tables
Table Borders
Table Sizes
Table Headers
Padding & Spacing
Colspan & Rowspan
Table Styling
Table Colgroup
HTML Lists
Lists
Unordered Lists
Ordered Lists
Other Lists
HTML Block & InlineHTML ClassesHTML IdHTML IframesHTML JavaScriptHTML File PathsHTML HeadHTML LayoutHTML ResponsiveHTML ComputercodeHTML SemanticsHTML Style GuideHTML EntitiesHTML SymbolsHTML EmojisHTML CharsetHTML URL EncodeHTML vs. XHTML
Further checks
HTML gives you the ability to validate inputs with regular expressions with the attribute. I decided to test it out.
Since I didn’t want whitespaces to be recognized, I started with the pattern. This pattern meant: One or more characters that’s not a whitespace.
Sure enough, it worked. If a user enters a whitespace into the field, the input doesn’t get validated.
But when a whitespace is entered (anywhere) into the input, the input gets invalidated.
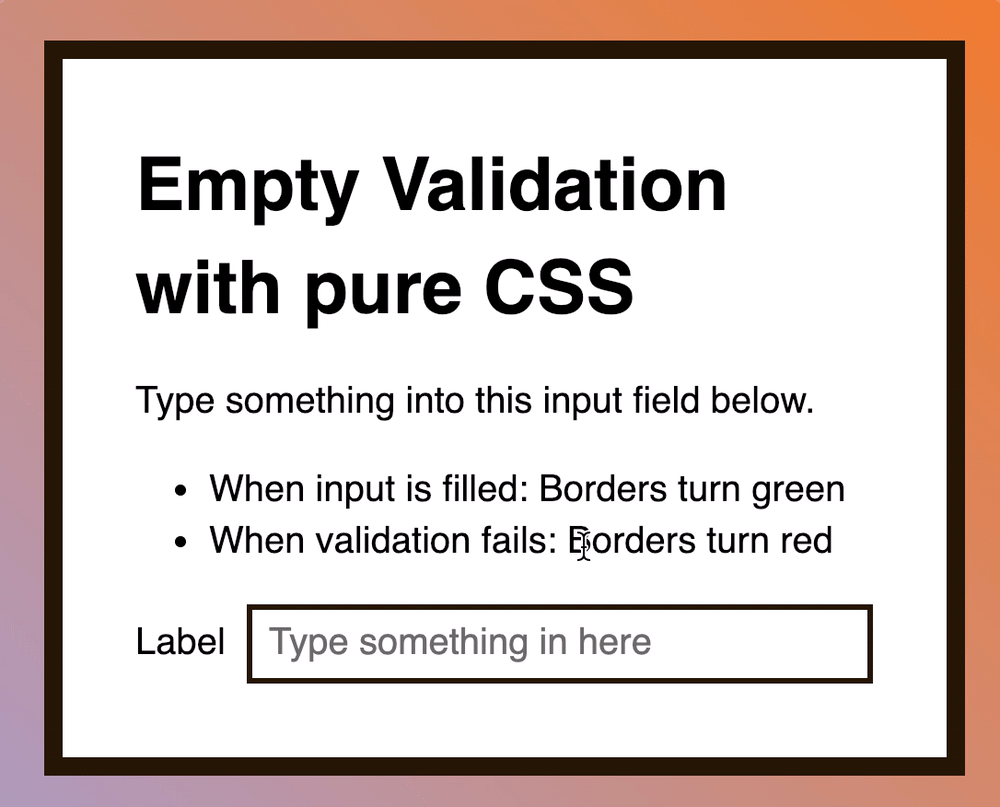
Unfortunately, this pattern didn’t work in my use case.
In Learn JavaScript’s autocomplete component, I taught students how to complete a list of countries. The names of some countries had spaces…
I had to include whitespaces in the mix.
The next best alternative I could think of is . This means 1 or more non-whitespace characters, followed by zero or more (any) characters.
This worked! I can enter whitespaces into the mix now!
But there’s one more problem… the input doesn’t validate if you START with a whitespace…

And that’s the problem I couldn’t resolve. More on this later.
When I worked on this article, I came across another interesting question: Is it possible to style an invalid state when the input is filled incorrectly?
Input Type Hidden
The
defines a hidden input field (not visible to a user).
A hidden field let web developers include data that cannot be seen or
modified by users when a form is submitted.
A hidden field often stores what database record that needs to be updated
when the form is submitted.
Note: While the value is not displayed to the user in the
page’s content, it is visible (and can be edited) using any browser’s developer
tools or «View Source» functionality. Do not use hidden inputs as a form of
security!
Example
<form> <label for=»fname»>First name:</label>
<input type=»text» id=»fname» name=»fname»><br><br> <input
type=»hidden» id=»custId» name=»custId» value=»3487″> <input
type=»submit» value=»Submit»></form>
Animated Inputs
The w3-animate-input class transforms the width of an input field to 100% when it gets focus:
Example
<input class=»w3-input w3-animate-input»
type=»text» style=»width:30%»>
Example
<input class=»w3-check» type=»checkbox» checked=»checked»>
<label>Milk</label><input class=»w3-check»
type=»checkbox»><label>Sugar</label>
<input class=»w3-check» type=»checkbox» disabled>
<label>Lemon (Disabled)</label>
Example
<input class=»w3-radio» type=»radio» name=»gender» value=»male» checked>
<label>Male</label><input class=»w3-radio»
type=»radio» name=»gender» value=»female»><label>Female</label><input class=»w3-radio»
type=»radio» name=»gender» value=»» disabled><label>Don’t know (Disabled)</label>
Select Options
Example
<select class=»w3-select» name=»option»> <option value=»» disabled
selected>Choose your option</option> <option value=»1″>Option
1</option> <option value=»2″>Option 2</option> <option
value=»3″>Option 3</option></select>
Example
<select class=»w3-select w3-border» name=»option»>
Form Elements in a Grid
In this example, we use W3.CSS’ Responsive Grid System to make the inputs appear on the same line (on smaller screens, they will stack horizontally with 100% width).
You will learn more about this later.
Example
<div class=»w3-row-padding»> <div class=»w3-third»>
<input class=»w3-input w3-border» type=»text» placeholder=»One»>
</div> <div class=»w3-third»> <input
class=»w3-input w3-border» type=»text» placeholder=»Two»> </div>
<div class=»w3-third»> <input class=»w3-input
w3-border» type=»text» placeholder=»Three»> </div></div>
Grid with Labels
Example
<div class=»w3-row-padding»> <div class=»w3-half»>
<label>First Name</label> <input
class=»w3-input w3-border» type=»text» placeholder=»Two»> </div>
<div class=»w3-half»> <label>Last
Name</label> <input class=»w3-input
w3-border» type=»text» placeholder=»Three»> </div></div>
❮ Previous
Next ❯
Значение атрибута type: tel
Элемент <input> типа tel применяется для того, чтобы сообщить браузеру, что в соответствующем поле формы пользователь должен ввести телефонный номер. Несмотря на то, что телефонный номер представляет из себя числовой формат вводимых данных, в браузерах поле типа tel ведет себя как обычное текстовое поле ввода. Однако, применение типа поля ввода tel приводит к появлению на экранах мобильных устройств специальной клавиатуры, предназначенной для облегчения ввода информации. Синтаксис поля ввода номера телефона:
- Результат
- HTML-код
- Попробуй сам » /
Телефон:
Значение
Описание
button
Создает кнопку с произвольным действием, действие по умолчанию не определено:
checkbox
Создает флажки, которые напоминают переключатели тем, что дают пользователю возможность выбирать из предложенных вариантов:Я знаю HTML
color
Генерирует палитры цветов обеспечивая пользователям возможность выбирать значения цветов в шестнадцатеричном формате RGB:
date
Позволяет вводить дату в формате дд.мм.гггг.:
День рождения:
datetime-local
Позволяет вводить дату и время, разделенные прописной английской буквой по шаблону дд.мм.гггг чч:мм:
Дата встречи — день и время:
Браузеры, поддерживающие язык HTML5, проверят, соответствует ли введенный посетителем адрес электронной почты принятому стандарту для данного типа адресов:
E-mail:
file
Позволяет загружать файлы с компьютера пользователя:
Выберите файл:
hidden
Создает скрытый элемент, не отображаемый пользователю. Информация,
хранящаяся в скрытом поле, всегда пересылается на сервер и не может быть изменена ни пользователем, ни браузером.
image
Создает элемент в виде графического изображения, действующий аналогично кнопке Submit:
month
Позволяет пользователю вводить год и номер месяца по шаблону гггг-мм:
number
Создает поле, в которое пользователь может вводить только числовое значение. Для типа ввода number браузер предоставляет виджет счетчика, который представляет собой поле, справа от которого находятся две кнопки со стрелками — для увеличения и уменьшения числового значения. Для указания минимальных и максимальных допустимых значений ввода предназначены атрибуты min и max, а также можно установить шаг приращения с помощью атрибута step:
Укажите число (от 1 до 10):
password
Текстовое поле для ввода пароля, в котором все вводимые символы заменяются звездочкой либо другим, установленным браузером значком:
Введите пароль:
radio
Создает элемент-переключатель в виде небольшого кружка (иногда их называют радио-кнопками):
Радио-кнопки:
range
Создает такой элемент интерфейса, как ползунковый регулятор. Ползунок предназначен только для выбора числовых значений в некоем диапазоне, при этом для пользователя не все браузеры отображают текущее числовое значение:
reset
Создает кнопку, которая очищает поля формы от введенных пользователем данных:
search
Создает поле поиска, по умолчанию поле ввода имеет прямоугольную форму:
Поиск:
submit
Создает стандартную кнопку, активизируемую щелчком мыши. Кнопка собирает информацию с формы и отправляет ее на сервер обработчику:
text
Создает однострочное поле ввода текста:
time
Допускает ввод значений в 24-часовом формате, например 17:30. Браузеры отображают его как элемент управления в виде числового поля ввода со значением, изменяемым с помощью мыши, и допускают ввод только значений времени:
Выберите время:
url
Заставляет браузер проверять, правильно ли пользователь ввел URL-адрес. Некоторые браузеры добавляют специфическую информацию в предупреждающие сообщения, выводимые на экран, при попытке отправить форму с некорректными значениями URL-адреса:
Главная страница:
week
Позволяет пользователю выбрать одну неделю в году, после чего обеспечит ввод данных в формате нн-гггг:
Выберите неделю:
HTML Tags
<!—><!DOCTYPE><a><abbr><acronym><address><applet><area><article><aside><audio><b><base><basefont><bdi><bdo><big><blockquote><body><br><button><canvas><caption><center><cite><code><col><colgroup><data><datalist><dd><del><details><dfn><dialog><dir><div><dl><dt><em><embed><fieldset><figcaption><figure><font><footer><form><frame><frameset><h1> — <h6><head><header><hr><html><i><iframe><img><input><ins><kbd><label><legend><li><link><main><map><mark><meta><meter><nav><noframes><noscript><object><ol><optgroup><option><output><p><param><picture><pre><progress><q><rp><rt><ruby><s><samp><script><section><select><small><source><span><strike><strong><style><sub><summary><sup><svg><table><tbody><td><template><textarea><tfoot><th><thead><time><title><tr><track><tt><u><ul><var><video>
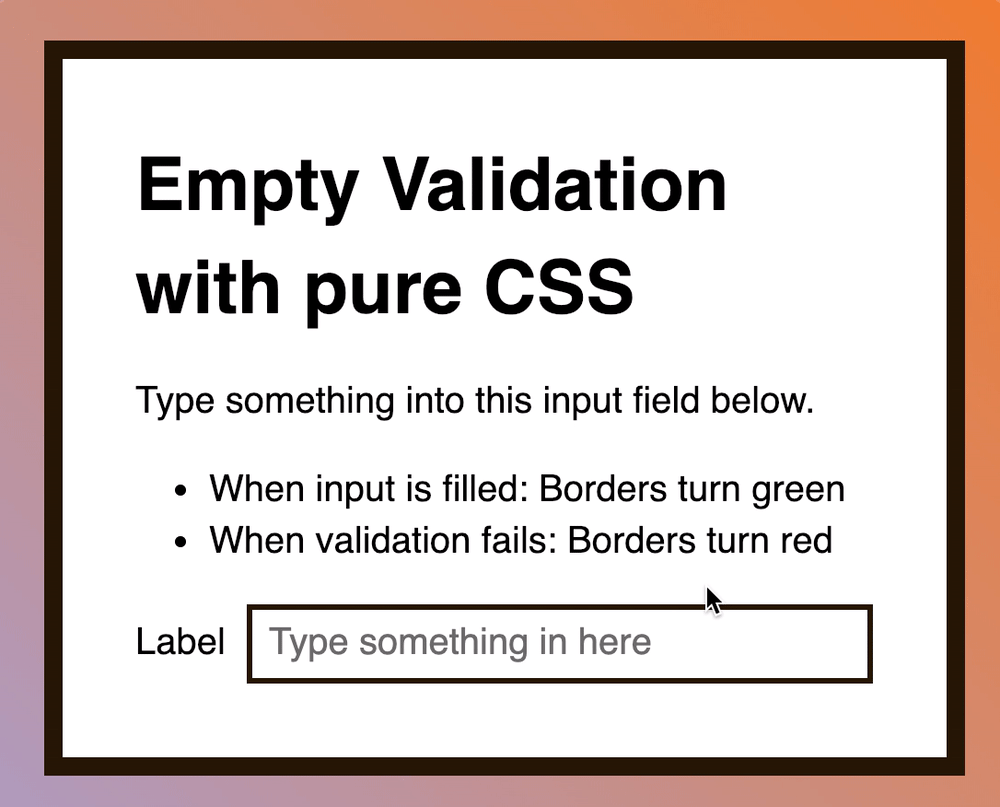
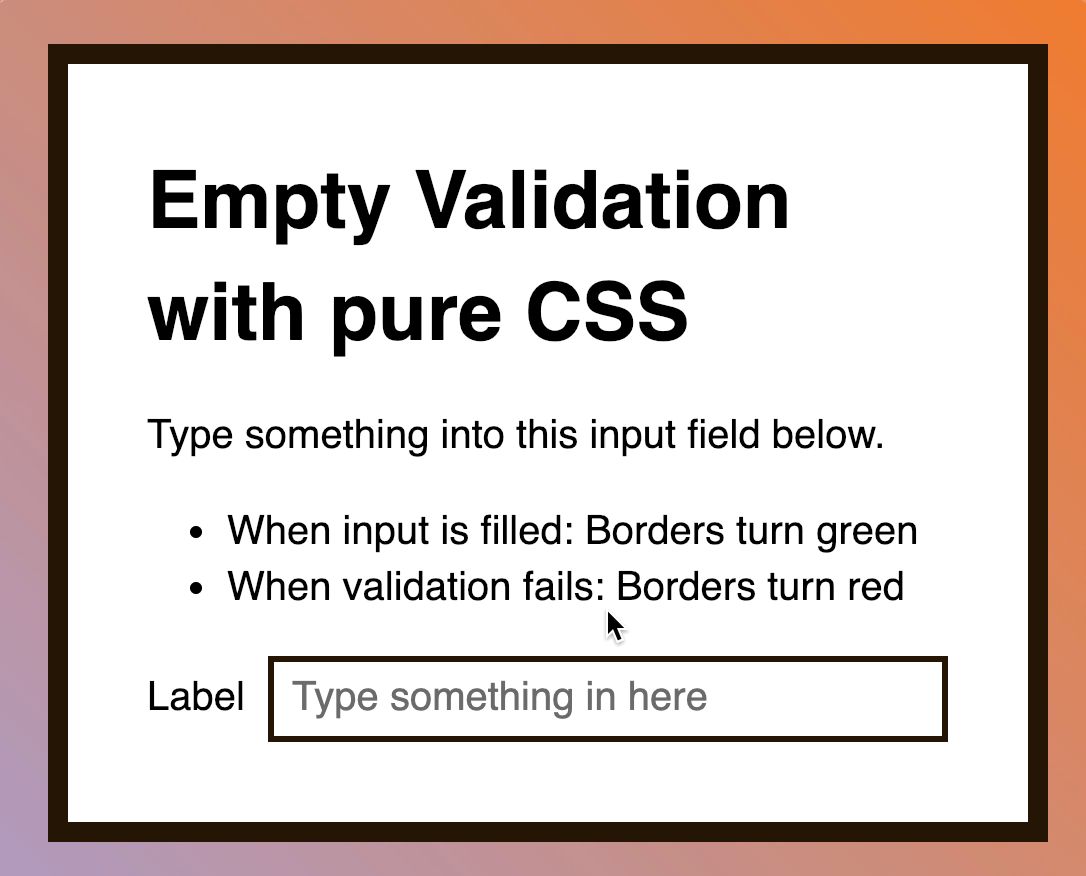
Invalidating the input
We don’t want to use because we’ll kickstart the input with an invalid state. (When the input is empty, it’s already invalid).
This is where Chris Coyier swooped in to the rescue with » Form Validation UX in HTML and CSS«.
In the article, Chris talks about a pseudo-class. It can be used to check whether a placeholder is shown.
The idea is:
- You add a placeholder to your input
- If the placeholder is hidden, it means the user typed something into the field
- Proceed with validation (or invalidation)
Here’s the CSS (simplified version. For the complete version, check out Chris’s article)
Since I had both validation AND invalidation styles, I had to ensure the valid styles came after the invalid styles.
Here’s a demo for you to play with:
See the Pen Pure CSS Empty validation by Zell Liew (@zellwk) on CodePen.
Note: Edge doesn’t support , so it’s probably not a good idea to use it in production yet. There’s no good way to detect this feature.
Now back to the problem I couldn’t resolve.
HTML Reference
HTML by AlphabetHTML by CategoryHTML Browser SupportHTML AttributesHTML Global AttributesHTML EventsHTML ColorsHTML CanvasHTML Audio/VideoHTML Character SetsHTML DoctypesHTML URL EncodeHTML Language CodesHTML Country CodesHTTP MessagesHTTP MethodsPX to EM ConverterKeyboard Shortcuts
HTML Tags
<!—>
<!DOCTYPE>
<a>
<abbr>
<acronym>
<address>
<applet>
<area>
<article>
<aside>
<audio>
<b>
<base>
<basefont>
<bdi>
<bdo>
<big>
<blockquote>
<body>
<br>
<button>
<canvas>
<caption>
<center>
<cite>
<code>
<col>
<colgroup>
<data>
<datalist>
<dd>
<del>
<details>
<dfn>
<dialog>
<dir>
<div>
<dl>
<dt>
<em>
<embed>
<fieldset>
<figcaption>
<figure>
<font>
<footer>
<form>
<frame>
<frameset>
<h1> — <h6>
<head>
<header>
<hr>
<html>
<i>
<iframe>
<img>
<input>
<ins>
<kbd>
<label>
<legend>
<li>
<link>
<main>
<map>
<mark>
<meta>
<meter>
<nav>
<noframes>
<noscript>
<object>
<ol>
<optgroup>
<option>
<output>
<p>
<param>
<picture>
<pre>
<progress>
<q>
<rp>
<rt>
<ruby>
<s>
<samp>
<script>
<section>
<select>
<small>
<source>
<span>
<strike>
<strong>
<style>
<sub>
<summary>
<sup>
<svg>
<table>
<tbody>
<td>
<template>
<textarea>
<tfoot>
<th>
<thead>
<time>
<title>
<tr>
<track>
<tt>
<u>
<ul>
<var>
<video>
<wbr>
Input Type Reset
defines a reset button
that will reset all form values to their default values:
Example
<form action=»/action_page.php»> <label for=»fname»>First
name:</label><br> <input type=»text» id=»fname» name=»fname»
value=»John»><br> <label for=»lname»>Last name:</label><br>
<input type=»text» id=»lname» name=»lname» value=»Doe»><br><br>
<input type=»submit» value=»Submit»> <input type=»reset»></form>
This is how the HTML code above will be displayed in a browser:
If you change the input values and then click the «Reset» button, the form-data will be reset to the default values.