Работа с картинками в html и css
Содержание:
- Code Example
- Controlling Image Width
- Informing the Browser — the actual purpose of
- Определение и использование
- Атрибуты
- Attributes
- Список атрибутов тега img
- Definition and Usage
- Должен ли я использовать width?
- Syntax
- Как вставить изображение в HTML?
- Атрибуты и свойства тега
- Background Images
- HTML Справочник
- HTML Теги
- JavaScript
- Responsive Image Gallery
- The Problem: Different Resolutions and Screen Sizes
- Attributes
- Supported Image Formats
- Тег
- Deprecated attributes
Code Example

Controlling Image Width
Before the advent of CSS, the display width of an image was controlled by the attribute. This usage has been deprecated. In the absence of any CSS rules defining the display width of the image, it will still work in most browsers. However, this is specifically contrary to the HTML5 specification.
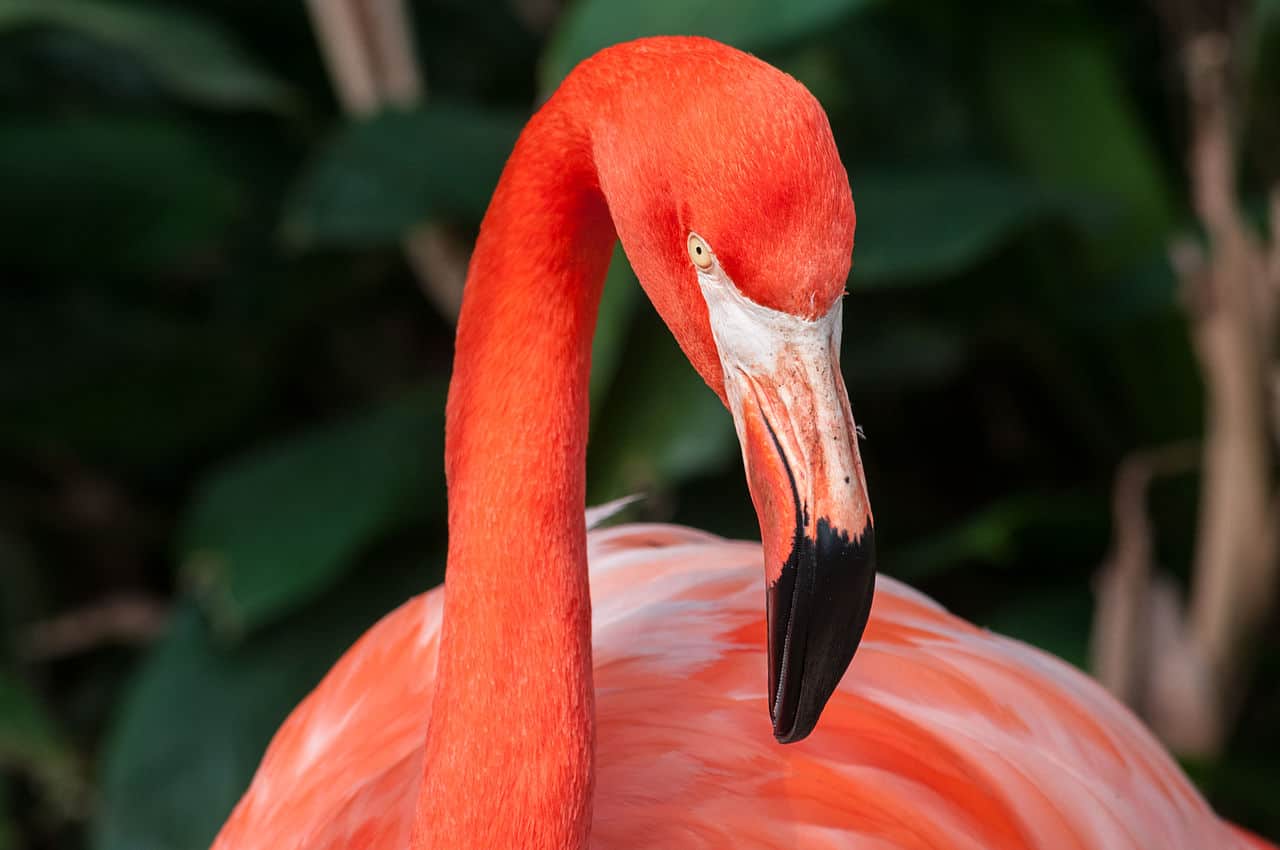
(Note: The image is much larger than 500px wide.)
For controlling how an image displays you should use CSS instead.
#fixed-width-flamingo { width: 500px; }
Responsive Image Widths
Generally speaking, you usually don’t want to control the exact width of an image. Every visitor who comes to your website has a potentially different size screen. If you specify the width, it may be much too small for some users and much too big for others. Most of the time, the best option is to make sure that your image is inside of a responsive (percent-based) container and then let it fill the container.
#responsive-image {width: 100%;height: auto;}
If you want to ensure a fully-responsive, optimal experience for all users, you can also use to specify additional image sizes or .
Informing the Browser — the actual purpose of
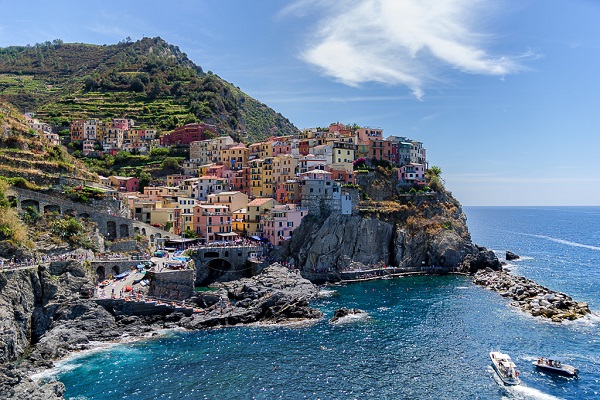
The actual purpose of the attribute, according to the specification, is to inform the browser of the actual, intrinsic width (in CSS pixels) of the image file. In other words — the attribute should be used to describe the source file, not how you want it displayed. This information can then be used by the browser in optimizing the rendering. This means that if you use CSS the way should, then the CSS — and not the element — will determine the actual display size of the image.
Note: On most screens, the image would overflow the container if it was actually 1280 pixels wide.
Should I use ?
Yes. It is not essential, but it will help the browser render your page faster and more cleanly, especially when combined with the element. Consider the example above — the CSS is set to and the is set to . Until the browser is able to download the entire image, and check the file header for its size, how does the browser know how much height to allot for the image? In the absence of a and attribute, it doesn’t. However, if both are specified, the browser can do some math to figure it out:
Doing this will stop that annoying jump that happens when a freshly loaded images suddenly takes up space in the document and shoves all the content down, causing the user to lose their place on the page. So yes, use the (and the ) attribute. But use it correctly — to identify the intrinsic height of the image file, not to specify the desired layout size.
Adam Wood
Определение и использование
Тег используется для встраивания изображения в HTML страницу.
Изображения технически не вставляются на веб страницу; изображения связаны с веб страницами.
Тег создает удерживающее пространство для ссылочного изображения.
Тег имеет два обязательных атрибута:
- src — Указывает путь к изображению
- alt — Задает альтернативный текст для изображения, если изображение по какой-либо причине не может быть отображено
Примечание: Кроме того, всегда указывайте ширину и высоту изображения.
Если ширина и высота не указаны, страница может мерцать во время загрузки изображения.
Совет: Чтобы связать изображение с другим документом,
просто вложите тег в тег <a> (см. пример ниже)
Атрибуты
= Новое в HTML5.
| Атрибут | Значение | Описание |
|---|---|---|
| align | top bottom middle left right |
Не поддерживается в HTML5. Задание выравнивания изображения в соответствии с окружающими элементами |
| alt | text | Задает альтернативный текст для изображения |
| border | pixels |
Не поддерживается в HTML5. Задает ширину границы вокруг изображения |
| crossorigin | anonymous use-credentials |
Разрешить использование изображений с веб-сайтов сторонних производителей для использования с Canvas |
| height | pixels | Задает высоту изображения |
| hspace | pixels |
Не поддерживается в HTML5. Указывает пробелы в левой и правой части изображения |
| ismap | ismap | Определяет изображение как серверное изображение-Map |
| longdesc | URL | Задает URL-адрес для подробного описания изображения |
| sizes | Определяет размеры изображения для различных макетов страниц | |
| src | URL | Указывает URL-адрес изображения |
| srcset | URL | Указывает URL-адрес изображения для использования в различных ситуациях |
| usemap | #mapname | Указывает изображение в виде клиентского изображения-карты |
| vspace | pixels |
Не поддерживается в HTML5. Указывает пробелы в верхней и нижней части изображения |
| width | pixels | Задает ширину изображения |
Attributes
| Attribute | Value | Description |
|---|---|---|
| alt | text | Specifies an alternate text for an image |
| crossorigin | anonymous use-credentials |
Allow images from third-party sites that allow cross-origin access to be used with canvas |
| height | pixels | Specifies the height of an image |
| ismap | ismap | Specifies an image as a server-side image map |
| eagerlazy | Specifies whether a browser should load an image immediately or to defer loading of images until some conditions are met |
|
| longdesc | URL | Specifies a URL to a detailed description of an image |
| referrerpolicy | no-referrerno-referrer-when-downgradeorigin origin-when-cross-originunsafe-url |
Specifies which referrer information to use when fetching an image |
| sizes | sizes | Specifies image sizes for different page layouts |
| src | URL | Specifies the path to the image |
| srcset | URL-list | Specifies a list of image files to use in different situations |
| usemap | #mapname | Specifies an image as a client-side image map |
| width | pixels | Specifies the width of an image |
Список атрибутов тега img
Использование тегов в HTML-разметке не принуждает использовать лишь один атрибут – при необходимости мы можем воспользоваться их любым количеством. Если используется два одинаковых атрибута, то приоритет будет за тем, что указан первым.
Полный список атрибутов:
src — базовый и обязательный, включающий в себя ссылку на изображение. Она может быть прописана как до файла, размещенного на другом веб-ресурсе, так и до изображения, которое находится на домашнем компьютере.
Возможные форматы: JPEG, JPG, PNG, GIF, BMP, ICO, APNG, SVG и Base64.
Пример:
<img src="https://example.com/photo/low.jpg"> или <img src="photo/low.jpg">
alt — устанавливается альтернативный текст для изображения. Текстовая информация отображается при отключенной загрузке графики в браузере пользователя и дает понять, что изображено на этой картинке. Помимо этого, данный атрибут также необходим для поисковых систем – таким образом они индексируют изображение и выводят пользователю подходящий результат. Может содержать русскую раскладку.
Пример:
<img src="photo/low.jpg" alt=”яхта на море”>
align — определяет выравнивание картинки относительно рядом находящегося текста.
Возможные значения: top, bottom, middle, left и right.
Пример:
<img src="photo/low.jpg" align=”middle”>
border — добавляет вокруг картинки рамку с выбранным размером.
Возможные значения: px, % и другие.
Пример:
<img src="photo/low.jpg" border=”25px”>
height – позволяет изменять высоту изображения, пропорционально которому изменяется ширина.
Возможные значения: px, % и другие.
Пример:
<img src="photo/low.jpg" height=”125px”>
width — позволяет изменять ширину изображения, пропорционально которой изменяется высота.
Возможные значения: px, % и другие.
Пример:
<img src="photo/low.jpg" width=”100px”>
hspace — добавляет отступ слева и справа от изображения.
Возможные значения: px, % и другие.
Пример:
<img src="photo/low.jpg" hspace=”50px”>
vspace — добавляет отступ сверху и снизу от изображения.
Возможные значения: px, % и другие.
Пример:
<img src="photo/low.jpg" vspace=”150px”>
longdesc — позволяет добавить адрес с расширенным описанием выбранной фотографии.
Возможный формат: txt.
Пример:
<img src="photo/low.jpg" longdesc="img/low.txt">
crossorigin — разрешает выполнить вставку изображения из другого источника, использовав кросс-доменный запрос.
Возможные значения: anonymous – анонимный запрос без передачи учетных данных, use-credentials – запрос с передачей учетных данных.
Пример:
<img src="https://switch.com/img/low.jpg" crossorigin="anonymous">
srcset – добавляет список изображений, которые будут отображаться в зависимости от ширины или плотности экрана. Не поддерживается в браузерах Android и Internet Explorer.
Допустимые значения: Nw, где N – любое целое положительное число, и Kx, где K – положительное десятичное число.
Пример:
<img src="img/low.jpg" srcset="img/low.jpg 320w, img/low-mid.jpg 480w, img/low-full.jpg 768w">
sizes — относится к предыдущему атрибуту и позволяет указать размер выбранных изображений.
Возможные значения: Nex, Nrem, Nem, Nvmin, Nch, Nvh, Nvw, Nvmax, Nin, Nq, Nmm, Npc, Ncm, Npt и Npx, где N – положительное число.
Пример:
<img src="img/low.jpg" srcset="img/low.jpg 320w, img/low-mid.jpg 480w, img/low-full.jpg 768w" sizes="(max-width: 800px) 500px, (min-width: 800px) 800px">
Работает следующим образом: при разрешении экрана меньше 800px задается ширина картинки в 500px. Если экран больше 800px, то изображение фиксируется в положении 800px.
usemap — позволяет совместить картинку с картой, которая была указана в теге .
Возможные значения: #name, где name – значение атрибута name карты, и #id, где id – значение атрибута id карты.
Пример:
<img src="img/low.jpg" usemap="#my_point">
ismap — совмещает фотографию с областью серверной карты. Таким образом, при нажатии считываются координаты клика от левого верхнего угла. Они отправляются запросом на указанный адрес в ссылке. Обязательное требование для работы с атрибутом: картинка должна быть обвернута в тег .
Пример:
<a href="map/ismap.php">

           <img src="img/low.jpg" ismap>

</a>
Definition and Usage
The tag is used to embed an image in an HTML page.
Images are not technically inserted into a web page; images
are linked to web pages. The tag creates a holding space for the referenced image.
The tag has two required attributes:
- src — Specifies the path to the image
- alt — Specifies an alternate text for the image, if the image for some
reason cannot be displayed
Note: Also, always specify the width and height of an image.
If width and height are not specified, the page might flicker while the image
loads.
Tip: To link an image to another document, simply nest the tag inside
an <a> tag (see example below).
Должен ли я использовать width?
Это поможет браузерам быстрее и более аккуратно отображать страницы, особенно в сочетании с элементом height. Рассмотрим приведенный выше пример.
В CSS width HTML устанавливается на 100%, а высота — на auto. Браузер не сможет узнать, сколько пикселей по высоте выделить для рисунка, пока не загрузит все изображение полностью и не проверит заголовок файла, чтобы узнать его размер. Если атрибуты width и height отсутствуют, программа не сможет этого сделать. Но если оба атрибута указаны, браузер сможет вычислить это с помощью математических расчетов:
display_height = img_height × ( display_width ÷ img_width )
Сделав это, можно предотвратить ситуацию, когда при загрузке изображения оно сдвигает контент вниз и происходит раздражающий резкий скачок, в результате которого пользователь теряет из виду часть текста. Используйте атрибуты HTML width height правильно – определяйте исходную высоту изображения, а не указывайте размер, в котором оно должно отображаться на странице.
Syntax
The tag is written as (no end tag) with the image URL inserted between the double quotes of the attribute.
The attribute can also be used in order to specify different images to use in different situations (e.g. high-resolution displays, small monitors, etc). The value of the attribute appears if the image cannot be loaded.
The attribute provides alternative text for users who are unable to view the image. Some reasons why users can’t view the image might include having a slow Internet connection, they are vision impaired and are using text-to-speech software, the image won’t load for some reason, etc. Note that the attribute is a required attribute.
Like this:
<img src=»myimage.jpg» alt=»My Image»>
You can also provide the image dimensions using the and attributes.
<img
src=»myimage.jpg»
alt=»My Image»
width=»100px»
height=»50px»>
Or you can provide the image dimensions using CSS.
<img
src=»myimage.jpg»
alt=»My Image»
style=»width:100px;height:50px;»>
Как вставить изображение в HTML?
Для того чтобы вставить изображение на HTML-страницу, используется одиночный простой тег:
<img src=”xxx”>,
где xxx — адрес изображения. В том случае, если картинка находится в одной директории со страницей, тег будет выглядеть как:
<img src=”image.png”>
Однако скоростной и стабильный интернет добрался ещё не во все уголки земного шара, и бывает так, что изображение на веб-сайте попросту не загружается. Для таких случаев существует понятие альтернативного текста.
Он показывается на месте картинки в момент его недоступности, загрузки или в режиме работы браузера «без картинок». Добавляется он с помощью атрибута alt тега <img>.
Пример добавления альтернативного текста к графическому файлу:
<!DOCTYPE html>
<html>
<head>
<meta charset="utf-8">
<title>Альтернативный текст</title>
</head>
<body>
<p><img src="images/example.png" alt="Альтернативный текст"></p>
</body>
</html>

Назначение размеров картинки в HTML
Для того чтобы изменить размеры отображения графического файла, используют теги height и width, где height — высота, а width — ширина, измеряемые в пикселях.
При использовании данных атрибутов браузер сначала выделяет место для графического контента, подготавливает общий макет страницы, отображает текст, после чего загружает саму картинку.
Рисунок помещается в прямоугольник с заданными размерами, а в том случае, если параметры меньше или больше исходных, картинка растягивается или сжимается.
Если атрибуты height и width не используются, браузер загружает изображение сразу, задерживая отображение текста и прочих элементов страницы.
Данные параметры можно указать как в пикселях (размер картинки постоянен и не зависит от разрешения экрана пользователя), так и в процентах (размер картинки зависит от разрешения экрана).
Например:
<img src=”example.png” width=”60” height=”40”>
или
<img src=”example.png” width=”50%” height=”10%”>
Следует помнить, что в тот момент, когда вы изменяете исходный размер изображения, необходимо сохранять его пропорции.
Для этого достаточно указать значение только одного из параметров (ширины или высоты), а значение второго браузер вычислит в автоматическом режиме.
Расположение картинки в HTML
Как и ко многим тегам HTML, к применим атрибут align, который выполняет выравнивание изображения:
<img src=”example.png” align=”top”> — картинка располагается выше текста;

<img src=”example.png” align=”bottom”> — картинка располагается ниже текста;

<img src=”example.png” align=”left”> — картинка располагается слева от текста;

<img src=”example.png” align=”right”> — картинка располагается справа от текста.

Картинка-ссылка
В HTML для создания ссылки используется тег <a>:
<a href=”адрес вашей ссылки”>Имя ссылки</a>
Для того чтобы задать графическую ссылку, необходимо всего лишь объединить тег изображения с тегом ссылки.
Делается это следующим образом:
<a href=”адрес ссылки”><img src=”адрес картинки”></a>
Как видите, графическая вставка может быть ссылкой и при клике переадресовывать на любой адрес, записанный в полном или сокращённом варианте.
Как можно сделать картинку фоном в HTML?
Изображение можно не только вставлять на страницу в качестве видимого объекта, но и сделать фоновым. Для определения картинки как фона необходимо в теге прописать атрибут background=”xxx”, где xxx — адрес картинки, указанный таким же способом, как в примерах выше.
Для примера зададим такую текстурную картинку в роли фоновой:
Сохраните изображение в папке с заготовленной заранее страницей и пропишите следующие строки:
<html>
<head><title>Страница с фоновой картинкой</head></title>
<body background=”image.jpg”>
<h1> Фон с текстом. </h1>
</body>
</html>

Фоновая картинка на странице задана.
На этом информация о тегах и атрибутах, необходимых для вставки изображения на HTML страницу сайта, исчерпана.
Желаем удачи!
Виталий Черкасовавтор
Атрибуты и свойства тега
1. Свойство align=»параметр» — определяет выравнивание рисунка. Это значение так же влияет на то, как текст будет обтекать рисунок. Может принимать следующее параметры:
- left — выравнивание по левому краю
- middle — выравнивание середины изображения по базовой линии текущей строки
- bottom — выравнивание нижней границы изображения по окружающему тексту
- top — верхняя граница изображения выравнивается по самому высокому элементу текущей строки
- right — выравнивание по правому краю
Пример 3.1. Выравнивание изображения в html по правому краю
Преобразуется на странице в следующее:
2. Свойство alt=»текст» — подсказка/описание картинки. Выполняет сразу две важные функции:
- Выдает подсказку при наведении
- Если в браузере отключены изображения, то выводится этот текст
Этот атрибут также очень важен при ранжировании изображений в Яндекс Картинках и Google Картинках. Его следует прописывать к каждому изображению, поскольку это является одним из факторов в алгоритмах поисковых системах.
3. Свойство border=»ЧИСЛО» — задает толщину рамки обтекающей изображение. Измеряется в пикселях. Более подробно читайте в отдельной статье: свойство CSS border
Пример 3.2. Вывод картинки в html с рамкой (границей)
Преобразуется на странице в следующее:

4. Свойство bordercolor=»цвет» — задает цвет рамки, которая обтекает изображение. Имеет смысл, только если атрибут border больше 0.
Пример 3.3. Вывод картинки в html с цветной рамкой
Результат можно видеть чуть выше.
Примечание
Атрибуты border и bordercolor можно задать в стилях CSS к img:
5. Свойство height=»ЧИСЛО» — задает высоту изображения: либо в пикселях, либо в процентах %. Например, если изображение имеет размер 400х200, а мы укажем высоту 150 пикселей, то оно сжимается до 300х150 (на 25% меньше), т.е. пропорционально.
6. Свойство width=»ЧИСЛО» — задает ширину изображения: либо в пикселях, либо в процентах %. Например, если изображение имеет размер 1000х800, а ширина указывается 1200 пикселей, то оно автоматически расширяется на 20% до 1200х960.
7. Свойство hspace=»ЧИСЛО» — задает горизонтальный отступ изображения в пикселях от других объектов html.
8. Свойство vspace=»ЧИСЛО» — задает вертикальный отступ изображения в пикселях от других объектов html.
Примечание
Вместо hspace и vspace советую применять старый и проверенный margin (более подробно про него можете прочитать в уроке про описание стилей html). Кратко напомню:
- margin-top: X px; (X — отступ сверху)
- margin-bottom: Y px; (Y — отступ внизу)
- margin-left: L px; (L — отступ слева)
- margin-right: R px; (R — отступ справа)
Задают отступы от объектов в пикселях. Допускаются отрицательные значения. По умолчанию либо наследуется значение предка, либо имеет значение 0.
Например. Отступ слева составляет 50 пикселей, а сверху 10 пикселей.
Преобразуется на странице в следующее:
В данном примере — отступ сверху составил 10 пикселей, слева 50 пикселей.
9. Свойство class=»имя_класса» — можно присвоить класс изображению, чтобы задать стиль всем изображениям этого класса.
Background Images
Background images can also respond to resizing and scaling.
Here we will show three different methods:
1. If the property is set to «contain», the
background
image will scale, and try to fit the content area. However, the image will keep its aspect ratio (the proportional relationship
between the image’s width and height):
Here is the CSS code:
Example
div { width: 100%; height: 400px;
background-image: url(‘img_flowers.jpg’); background-repeat: no-repeat; background-size: contain; border: 1px solid red;}
2. If the property is set to «100% 100%», the background image will stretch to cover the entire content area:
Here is the CSS code:
Example
div { width: 100%; height: 400px;
background-image: url(‘img_flowers.jpg’);
background-size: 100% 100%; border: 1px solid red;}
3. If the property is set to «cover», the background image will scale
to cover the entire content area. Notice that the «cover» value keeps the aspect
ratio, and some part of the background image may be
clipped:
Here is the CSS code:
Example
div { width: 100%; height: 400px;
background-image: url(‘img_flowers.jpg’); background-size: cover; border: 1px solid red;}
HTML Справочник
HTML Теги по алфавитуHTML Теги по категорииHTML ПоддержкаHTML АтрибутыHTML ГлобальныеHTML СобытияHTML Названия цветаHTML ХолстHTML Аудио/ВидеоHTML ДекларацииHTML Набор кодировокHTML URL кодHTML Коды языкаHTML Коды странHTTP СообщенияHTTP методыКовертер PX в EMКлавишные комбинации
HTML Теги
<!—…—>
<!DOCTYPE>
<a>
<abbr>
<acronym>
<address>
<applet>
<area>
<article>
<aside>
<audio>
<b>
<base>
<basefont>
<bdi>
<bdo>
<big>
<blockquote>
<body>
<br>
<button>
<canvas>
<caption>
<center>
<cite>
<code>
<col>
<colgroup>
<data>
<datalist>
<dd>
<del>
<details>
<dfn>
<dialog>
<dir>
<div>
<dl>
<dt>
<em>
<embed>
<fieldset>
<figcaption>
<figure>
<font>
<footer>
<form>
<frame>
<frameset>
<h1> — <h6>
<head>
<header>
<hr>
<html>
<i>
<iframe>
<img>
<input>
<ins>
<kbd>
<label>
<legend>
<li>
<link>
<main>
<map>
<mark>
<meta>
<meter>
<nav>
<noframes>
<noscript>
<object>
<ol>
<optgroup>
<option>
<output>
<p>
<param>
<picture>
<pre>
<progress>
<q>
<rp>
<rt>
<ruby>
<s>
<samp>
<script>
<section>
<select>
<small>
<source>
<span>
<strike>
<strong>
<style>
<sub>
<summary>
<sup>
<svg>
<table>
<tbody>
<td>
<template>
<textarea>
<tfoot>
<th>
<thead>
<time>
<title>
<tr>
<track>
<tt>
<u>
<ul>
<var>
<video>
<wbr>
JavaScript
JS Array
concat()
constructor
copyWithin()
entries()
every()
fill()
filter()
find()
findIndex()
forEach()
from()
includes()
indexOf()
isArray()
join()
keys()
length
lastIndexOf()
map()
pop()
prototype
push()
reduce()
reduceRight()
reverse()
shift()
slice()
some()
sort()
splice()
toString()
unshift()
valueOf()
JS Boolean
constructor
prototype
toString()
valueOf()
JS Classes
constructor()
extends
static
super
JS Date
constructor
getDate()
getDay()
getFullYear()
getHours()
getMilliseconds()
getMinutes()
getMonth()
getSeconds()
getTime()
getTimezoneOffset()
getUTCDate()
getUTCDay()
getUTCFullYear()
getUTCHours()
getUTCMilliseconds()
getUTCMinutes()
getUTCMonth()
getUTCSeconds()
now()
parse()
prototype
setDate()
setFullYear()
setHours()
setMilliseconds()
setMinutes()
setMonth()
setSeconds()
setTime()
setUTCDate()
setUTCFullYear()
setUTCHours()
setUTCMilliseconds()
setUTCMinutes()
setUTCMonth()
setUTCSeconds()
toDateString()
toISOString()
toJSON()
toLocaleDateString()
toLocaleTimeString()
toLocaleString()
toString()
toTimeString()
toUTCString()
UTC()
valueOf()
JS Error
name
message
JS Global
decodeURI()
decodeURIComponent()
encodeURI()
encodeURIComponent()
escape()
eval()
Infinity
isFinite()
isNaN()
NaN
Number()
parseFloat()
parseInt()
String()
undefined
unescape()
JS JSON
parse()
stringify()
JS Math
abs()
acos()
acosh()
asin()
asinh()
atan()
atan2()
atanh()
cbrt()
ceil()
clz32()
cos()
cosh()
E
exp()
expm1()
floor()
fround()
LN2
LN10
log()
log10()
log1p()
log2()
LOG2E
LOG10E
max()
min()
PI
pow()
random()
round()
sign()
sin()
sqrt()
SQRT1_2
SQRT2
tan()
tanh()
trunc()
JS Number
constructor
isFinite()
isInteger()
isNaN()
isSafeInteger()
MAX_VALUE
MIN_VALUE
NEGATIVE_INFINITY
NaN
POSITIVE_INFINITY
prototype
toExponential()
toFixed()
toLocaleString()
toPrecision()
toString()
valueOf()
JS OperatorsJS RegExp
constructor
compile()
exec()
g
global
i
ignoreCase
lastIndex
m
multiline
n+
n*
n?
n{X}
n{X,Y}
n{X,}
n$
^n
?=n
?!n
source
test()
toString()
(x|y)
.
\w
\W
\d
\D
\s
\S
\b
\B
\0
\n
\f
\r
\t
\v
\xxx
\xdd
\uxxxx
JS Statements
break
class
continue
debugger
do…while
for
for…in
for…of
function
if…else
return
switch
throw
try…catch
var
while
JS String
charAt()
charCodeAt()
concat()
constructor
endsWith()
fromCharCode()
includes()
indexOf()
lastIndexOf()
length
localeCompare()
match()
prototype
repeat()
replace()
search()
slice()
split()
startsWith()
substr()
substring()
toLocaleLowerCase()
toLocaleUpperCase()
toLowerCase()
toString()
toUpperCase()
trim()
valueOf()
Responsive Image Gallery
CSS can be used to create image galleries. This example use
media queries to re-arrange the images on different screen sizes. Resize the
browser window to see the effect:
Add a description of the image here
Add a description of the image here

Add a description of the image here

Add a description of the image here
Example
.responsive {
padding: 0 6px; float: left; width: 24.99999%;}@media only screen and
(max-width: 700px){ .responsive {
width: 49.99999%; margin: 6px
0; }}@media only screen and (max-width: 500px){ .responsive { width: 100%;
}}
Tip: Read more about Responsive Web Design in our
CSS RWD Tutorial.
The Problem: Different Resolutions and Screen Sizes
This is probably obvious to you (we hope), but not everyone browses the internet with the same size screen. We use everything from oversized desktop monitors to tiny screens we keep in our pockets. This presents some challenges around how we deal with page design, including images.
And it isn’t just size — resolution is an issue as well. 4K HD monitors and Apple’s Retina display are packing more pixels than ever into a smaller space, and that trend is likely to continue. to make images look good on these screens, the source files need to be much larger — two, three, or even four times the size of images intended for conventional displays.
Attributes
| Attribute | Value | Description |
|---|---|---|
| align | leftrighttopbottommiddle | Defines the alignment of the image in reference to surrounding elements. Not supported in HTML5. |
| alt | text | Defines the alternate text for the image. |
| border | pixels | Defines the width of the border around the image.Not supported in HTML5. |
| crossorigin | ||
| Defines, whether the CORS (a technology, that allows a web page to access resources from another domain) is used when loading the image. Images, uploaded via CORS, can be used in the <canvas> element without limiting the functionality of the latter. | ||
| anonymous | CORS requests from this element will not pass credentials. | |
| use-credentials | CORS requests from this element will pass credentials. New attribute in HTML5. | |
| height | pixels | Defines the height of the image. |
| hspace | pixels | Defines spaces at the left and right sides of the image.Not supported in HTML5. |
| ismap | ismap | Specifies that the contents of the tag is a server-side image map. |
| longdesc | URL | Specifies the URL address with a detailed description of the image (For a short description of the image, use the alt attribute. Not supported in HTML5. |
| src | URL | Defines the source of the image. |
| usemap | #mapname | Specifies a link to the <map> element, which contains the coordinates for the client map image. |
| vspace | pixels | Defines spaces at the top and bottom of the image.Not supported in HTML5. |
| width | pixels | Defines the width of the image. |
The <img> tag supports the Global Attributes and the Event Attributes.
Supported Image Formats
Image file formats are standardized means to organize and store digital images. An image file format may store data in an uncompressed format, a compressed format (which may be lossless or lossy), or a vector format. (Wikipedia).
Each user agent supports different image formats. Here is the list of common image formats:
| Abbreviation | File format | MIME type | File extension(s) | Browser compatibility |
|---|---|---|---|---|
| APNG | Animated Portable Network Graphics | image/apng | .apng | Chrome, Edge, Firefox, Opera, Safari |
| BMP | Bitmap file | image/bmp | .bmp | Chrome, Edge, Firefox, Opera, Safari |
| GIF | Graphics Interchange Format | image/gif | .gif | Chrome, Edge, Firefox, Opera, Safari |
| ICO | Microsoft Icon | image/x-icon | .ico, .cur | Chrome, Edge, Firefox, Opera, Safari |
| JPEG | Joint Photographic Expert Group image | image/jpeg | .jpg, .jpeg, .jfif, .pjpeg, .pjp | Chrome, Edge, Firefox, Opera, Safari |
| PNG | Portable Network Graphics | image/png | .png | Chrome, Edge, Firefox, Opera, Safari |
| SVG | Scalable Vector Graphics | image/svg+xml | .svg | Chrome, Edge, Firefox, Opera, Safari |
| TIFF | Tagged Image File Format | image/tiff | .tif, .tiff | None built-in; add-ons required |
| WebP | Web Picture format | image/webp | .webp | Chrome, Edge, Firefox, Opera |
Тег
С точки зрения html добавить изображение на страницу можно с помощью тега <img>, который имеет 2 обязательных атрибута:
- src — для указания пути к файлу изображения. Если путь указан неверно или изображение было удалено с сервера, то картинку вы не увидите.
- alt — для указания альтернативного текста, который поясняет, что изображено на картинке. Этот атрибут нужен для индексации поисковиками (поиск по картинке) и для программ-скринридеров. Увидеть текст этого атрибута можно, когда путь к изображению в атрибуте src написан неверно.
Тег img
<img src=»images/nature.jpg» alt=»Природа»>
| 1 | <img src=»images/nature.jpg»alt=»Природа»> |
Форматы файлов для WEB:
JPEG (.jpg) — позволяет сохранять файлы фотографического качества с миллионами цветов, градиентными переходами в хорошем качестве при небольшом весе файла.
GIF (.gif) — индексированное изображение, в котором можно сохранить не более 256 цветов. GIF поддерживает прозрачность и анимацию. Плохо сохраняет градиенты, зато области сплошного цвета сохраняет хорошо.
PNG (.png) — делится на 2 формата: png-8 и png-24, где цифра указывает на количество бит, с помощью которого можно сохранить изображение. PNG-8 — этот тот же GIF по настройкам, но без возможности сохранять анимацию. А PNG-24, как и JPG позволяет описать изображение с миллионами цветов, но также сохраняет прозрачность. Соответственно, и размеры файлов в PNG-8 и PNG-24 будут отличаться: последний всегда будет больше весить. Но и качество у него будет лучше.
SVG (.svg) — от англ. Scalable Vector Graphics — масштабируемая векторная графика — позволяет сохранять файлы, созданные в Adobe Illustrator (векторной графической программе) в текстовом виде, похожем на XML. Файлы с таким форматом не изменяются при увеличении или уменьшении их размера, т.к. по сути своей являются масштабируемыми.
Deprecated attributes
The element has been a part of the HTML specification almost since the beginning, and has been a vital part of HTML-based page design since before the advent of modern browsers, CSS3, or semantic markup. Because of this history, there are a large number of deprecated (no longer in use) attributes that have previously been used with the element.
Many of the deprecated attributes are related to layout and positioning, other have to do with browser behavior. In most cases, CSS is the preferred method for achieving these layout effects. In other cases, JavaScript is the best way to get the desired results.
Deprecated attributes are marked below in red. Where possible, we have provided additional information on how to achieve the desired effects using modern standards.
For more information about deprecated tags and other changes to the HTML specification, see our article on HTML5.