Выполнение основных задач в графическом редакторе gimp
Содержание:
- Source for version 2.99 (Development)
- Changing the Size (Dimensions) of an Image (Scale)
- Как пользоваться редактором Gimp
- The Gimp module
- Other Packages
- Render caching
- End notes
- GIMP for Windows
- Plug-ins
- Creating text
- Slider widget
- Начинающим: уроки по GIMP
- Painting
- File formats support
- GEGL port, high bit depth support, multi-threading, and more
- Features
- Source for version 2.10 (Stable)
- Better Tools
- Improved import policies
- GIMP for Unix-like systems
- Introduction to GIMP
- Как пользоваться инструментами редактирования GIMP
- Donate to the Project
- Multi-threading preferences now available from plug-ins
Source for version 2.99 (Development)
GIMP releases available from gimp.org and its mirrors contain the source code and have to be compiled in order to be installed on your system.
For instructions, how to build GIMP from source code, please see this page.
GIMP 2.99.6 is now available at https://download.gimp.org/mirror/pub/gimp/v2.99/.
To allow you to check the integrity of the tarballs, here are the sums of the latest releases:
-
gimp-2.99.6.tar.bz2
(sha256): - 8d264b28445a3df2b940f30ee0b89b469255e975e8563b889fd57fb2f58f66a0
-
gimp-2.99.4.tar.bz2
(sha256): - df25c149c78f265181809d7685a9470a62c3c2f08c05e8498a4d5c86a048a5b2
-
gimp-2.99.2.tar.bz2
(sha256): - 39dc99a1581bbaafa9d6686bf246f7be12b0788ebfc37d185dea5bdae9c3ae73
GIMP help files are available at https://download.gimp.org/mirror/pub/gimp/help/.
Please consider using one of the mirrors listed below.
Changing the Size (Dimensions) of an Image (Scale)
This is a very simple task to accomplish in GIMP easily.
The image we’ll be using to illustrate this with is The Horsehead Nebula in Infrared.
When you first open your image in GIMP, chances are that the image will be zoomed so that the entire image fits in your canvas. The thing to notice for this example is that by default the window decoration at the top of GIMP will show you some information about the image.
![]()
View of the GIMP canvas, with information at the top of the window.
Notice that the information at the top of the window shows the current pixel dimensions of the image (in this case, the pixel size is 1225×1280).
To resize the image to new dimensions, we need only invoke the Scale Image dialog:
Image → Scale Image…
This will then open the Scale Image dialog:
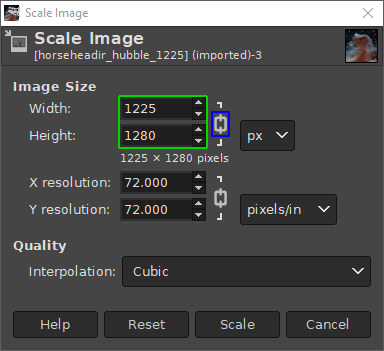
The Scale Image dialog.
In the Scale Image dialog, you’ll find a place to enter new values for Width and Height. If you know one of the new dimensions you’d like for the image, fill in the appropriate one here.
You’ll also notice a small chain just to the right of the Width and Height entry boxes. This icon shows that the Width and Height values are locked with respect to each other, meaning that changing one value will cause the other to change in order to keep the same aspect ratio (no strange compression or stretching in the image).
For example, if you knew that you wanted your image to have a new width of 600px, you can enter that value in the Width input, and the Height will automatically change to maintain the aspect ratio of the image:
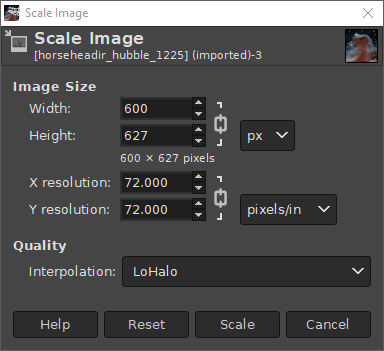
Changing the Width to 600px.
As you can see, entering 600px for the width automatically changes the height to 627px.
Also notice I have shown a different option under Quality → Interpolation. The default value for this is Cubic, but to retain the best quality it would better to use Sinc (Lanczos3).
If you want to specify a new size using a different type of value (other than Pixel size), you can change the type by clicking on the “px” spinner:
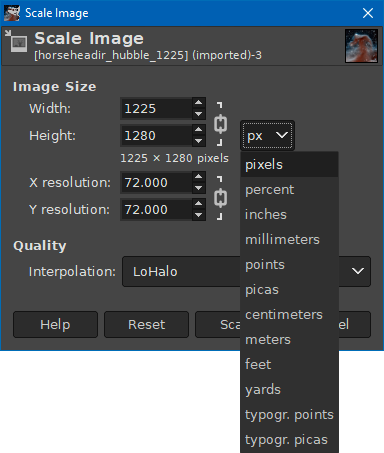
Changing input value types.
A common use for this could be if you wanted to specify a new size as a percentage of the old one. In this case you could change to “percent”, and then enter 50 in either field to scale the image in half.
Once you are done scaling the image, don’t forget to export the changes you’ve made:
File → Export…
to export as a new filename, or:
File → Overwrite {FILENAME}
to overwrite the original file (use caution).
For more detail about using Scale Image, you can see the documentation.
Как пользоваться редактором Gimp
Для начала скачайте программу на свой компьютер. Всегда свежую версию можно получить на официальном сайте. Выберите версию для своей операционной системы. Ссылка по кнопке ниже.
Установите программу на компьютер и запустите её. Вы увидите интерфейс с разнообразными инструментами редактирования. Всё выглядит и расположено привычно, интуитивно понятно, как и во всех подобных редакторах.
Интерфейс редактора.
Для того, чтобы начать пользоваться редактором Gimp, нужно либо создать в нём изображение самостоятельно, либо загрузить готовое фото, и начать его редактировать, изменять. Нажмите в верхнем меню «Файл», а затем либо «Создать проект», либо «Открыть». Можно также использовать традиционные для этого горячие клавиши — ctrl + N или ctrl + O, соответственно.
Откройте изображение или создайте новое, чтобы начать пользоваться редактором Gimp.
Вы увидите изображение на рабочем пространстве и сможете выполнять с ними разнообразные операции с помощью инструментов, расположенных в панелях управления.
Изображение, загруженное в Gimp готово к редактированию.
Давайте рассмотрим ниже, какие инструменты для работы с изображением есть в этом редакторе.
The Gimp module
Most scripts make use of the simplified interface Gimp::Fu provided with the Gimp module. Gimp::Fu provides a framework for entering parameters to the script in a dialog-box interface, just like Script-Fu, but also allows running of the script in batch mode from the command line. This tutorial will go into detailed descriptions of the construction of a Gimp::Fu script, but before we do this, here is the general framework of such a script.
1 2 3 4 5 6 7 8 9 10 11 12 13 14 15 16 17 18 19 20 21 22 23 24 25 26 27 28 29 30 31 32 33 34 35 |
The key points to note in the script are:
- the use of the two modules and ,
- the podregister function, which will be described in detail below,
- the way the control is handed over to module on line 8, and
- the POD documentation below the line.
Other Packages
Print plug-in does not compile
Starting with version 1.2.4, the print plug-in depends on libgimpprint, which is now distributed as a separate package. The previous versions of GIMP (up to 1.2.3) included all files as part of the GIMP distribution, but you should now download and install libgimpprint 4.2.6 separately from the Gimp-Print site:
Once the lib is compiled and installed, run ldconfig as root and the print plug-in should compile.
JPEG plug-in does not compile
The jpeg plug-in requires the jpeg library. If you don’t have it installed or you have a very old version, then you need to get a recent jpeg library. The places to look are:
Once the lib is compiled and installed, run ldconfig as root and the jpeg plug-in should compile.
TIFF plug-in does not compile
The tiff plug-in requires the tiff library. See the jpeg problem mentioned above. Same deal, different lib. The places to look are at:
Once the lib is compiled and installed, run ldconfig as root and the tiff plug-in should compile.
PNG plug-in does not compile
The png plug-in requires libpng and libz (zlib). See the jpeg problem mentioned above. Same deal, different lib. The places to look are at:
Once the lib is compiled and installed, run ldconfig as root and the png plug-in should compile.
XPM plug-in does not compile
The xpm plug-in requires the xpm library. See the jpeg problem above. Same deal, different lib. The places to look are at:
Render caching
GIMP 3 now has a render cache that keeps the result of scaling, color
management, display filters and shell mask (for tools like Fuzzy Select).
This results in much snappier user experience in comparison to the GTK2
version of GIMP.
There is now also a Zoom Quality setting in Preferences -> Display.
When set to Fast, GIMP will do a nearest neighbor interpolation from
the next bigger mipmap level instead of linear or box filtering. This
gives a slight and permanent boost to painting and all updates. We have
a few ideas to improve this further like reblitting in high quality
after a timeout.
Status: done.
End notes
This tutorial has covered only a small part of the possibilities available to a script writer. In particular the following issues available to Gimp::Perl scripts have not been covered:
- The possibility of writing customized Gtk interfaces (see examples/example-no-fu in the Gimp-Perl distribution).
- Writing fully-fledged plug-ins that manipulate the tile data through the Perl Data Language (PDL) module (see examples/map_to_gradient in the Gimp-Perl distribution).
- Using Gimp-Perl in a CGI environment.
- How to fill with gradients in a plugin (see examples/randomblends in the Gimp-Perl distribution).
- How to do polygon selections (see examples/triangle in the Gimp-Perl distribution).
The Gimp-Perl distribution also has over 50 more example scripts supplied. Take a look through those for further inspiration!
GIMP for Windows
Download GIMP 2.10.28
via BitTorrent
Download GIMP 2.10.28
directly
The download links above will attempt to download GIMP from one of our trusted mirror servers.
If the mirrors do not work or you would rather download directly from our server, you can get the direct download here.
Supported OS: Windows 7 or over
These links download the official GIMP installer for Windows (~200 MB).
The installer contains both 32-bit and 64-bit versions of GIMP, and will automatically use the appropriate one.
BitTorrent is a peer-to-peer file sharing system. It works by downloading GIMP from a distributed network of BitTorrent users, and may improve download speed dramatically.
Choosing this option will download the torrent file for the GIMP installer.
You may need to install a torrent client to make use of this file. Learn more…
Hash Sum
The SHA256 hash sum for is:
2c2e081ce541682be1abdd8bc6df13768ad9482d68000b4a7a60c764d6cec74e
Check it on
VirusTotal:
Older Downloads
- Previous v2.10 installers for Windows can be found here: download.gimp.org.
- Previous v2.8 installers for Windows can be found here: download.gimp.org.
GIMP User Manual
These links download language-specific Windows installers for GIMP’s local help.
By default, they will place the help files with your GIMP installation.
Note: GIMP uses online help by default. If you want to use this local help offline, you will need to change GIMP’s help settings.
- In GIMP, select > >
- For «User manual», select «Use a locally installed copy»
- Under «Help Browser», you can choose between your system’s web browser and GIMP’s help browser plugin (if available).
See the for more settings.
Plug-ins
GIMP now ships with over 80 GEGL-based filters. A lot of those are former GIMP effects. Here is why GEGL-based implementations
are better:
- You can apply them on images in 32-bit per color channel precision mode.
- You can preview them right on the canvas, and if an image is larger than the
viewport, GIMP will render the viewport first for immediate feedback. - You can use split preview to compare original image with its processed version
and swap before/after sides both horizontally and vertically. - In a future non-destructive GIMP, you will be able to adjust settings of those
filters without undoing a ton of steps.

Some of the GEGL-based filters have OpenCL version for hardware acceleration.
This will come in handy, if OpenCL drivers work well for you.
Furthermore many operations can come multi-threaded to use your processor at
their full power.
Creating text
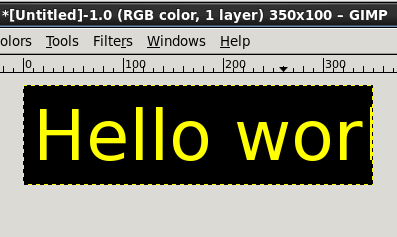
8.1. Hello World — writing text in an image
To create text the PDB function gimp_text_fontname() may be used.
Here is an example of a script that creates an image containing “Hello world”.
| (hello-world1) |
|---|
|
#!/usr/bin/perl use Gimp; podregister { exit main; =head1 NAME hello_world1 — basic text =head1 SYNOPSIS /File/Create/Tutorial/Basic text 1 =head1 DESCRIPTION basic text =head1 PARAMETERS , =head1 AUTHOR Dov =head1 DATE 2004-03-27 =head1 LICENSE Dov |
The result:
One thing to note in this script is that the text that is created on line 15 is a floating layer, that needs to be anchored to its parent layer. This is done in line 16 through the call to gimp_floating_sel_anchor().
This script suffers from the problem that the image size is unrelated to the text size. This is taken care of in the following more complex example which shows the basic steps for a logo generating script:
- Creation of an image of arbitrary size
- Creation of a background drawable of an arbitrary size
- Creation of text layer which exactly fits the text with the command gimp_text_fontname.
- Resizing the image and the background to the size of the text layer.
The result is an image composed of two layers; a transparent text layer on top of a uniform background.
| (basic-logo) |
|---|
|
#!/usr/bin/perl use Gimp; podregister { exit main; =head1 NAME basic_logo — Basic logo =head1 SYNOPSIS /File/Create/Tutorial/Basic Logo =head1 DESCRIPTION Make a basic logo. =head1 PARAMETERS , =head1 AUTHOR Dov Grobgeld =head1 DATE 2004-03-27 =head1 LICENSE Dov Grobgeld |
Note the special syntax of gimp_image_text_fontname in line 14 in basic-logo with the drawable = -1. The special case drawable=-1 means that instead of creating a floating layer, a new image layer will be created.
The dialog and the resulting image:
![]()
Slider widget
We fixed several discoverability issues in the new (more compact) slider
widget. This was mostly the result of usability tests by Aryeom after
extensive use in production.
Before, if you tried to edit the scale value numerically (i.e. by inputting numbers on keyboard), you’d also trigger a value change by using the main
mouse button click. You could avoid that by using the middle mouse button
click, but is was hardly discoverable.
So now you can pinpoint-click the displayed numbers. This action will only focus the text input (by default entirely selecting the existing value as
is common when focusing text entries). You can still click-edit the value
from everywhere in the widget, except exactly on the numbers.
The second issue was related to changing the cursor depending on the context:
- The top-arrow cursor came from a time where this widget had 2 areas, a
top and bottom. It didn’t really mean anything anymore with the
new interaction. We replaced it by a common “grab” cursor as
defined in the CSS specification. This becomes a “grabbing” cursor
when a click’n’drag is in progress. - When the pointer is hovering the text area, it becomes a “text”
cursor instead, hence advertizing the fact that a click here would
start editing the number. - Finally, when holding the modifier key, the cursor will become
a horizontal resize cursor (“col-resize” in the CSS specification),
hence advertizing the ability for smaller relative resizing (an action
also available with the third button, usually ).
 GIMP 2.99.4: from left to right, new cursors on the slider to grab, when grabbing, do small updates or text-edit
Начинающим: уроки по GIMP
- Графический редактор GIMP пригоден для использования как любителями, так и профессионалами. Программа может применяться в качестве простого в освоении редактора фотографий для ретуши и обработки, преобразователя форматов изображений.
- При работе над изображениями можно выполнять многократную отмену и повторы действий, пользоваться опциями вращения картинки или фото, их масштабирования, искривления и отражения. Высококачественное сглаживание и хорошее качество итогового материала дает субпиксельная дискретизация любых используемых инструментов.
- Бесплатный фотошоп подразумевает исчерпывающий набор инструментов – с помощью штампов и кистей, карандашей и распылителей можно оформить полиграфическую продукцию, подготовить графики для интернет-страниц, корректировать фото и картинки. Также среди интересных функций программы – разработка анимационных видео.
- Среди линейки инструментов выделения присутствуют уже знакомые пользователям графических программ прямоугольное, свободное и эллиптическое выделение, выделение кривыми и инструмент «волшебная палочка».
- Данный редактор фото превосходно работает с любыми форматами файлов, начиная от традиционных PNG, GIF и JPEG до форматов TIFF, BMP, PDF, PCX и т.д.
- Для начинающих пользователей на моем блоге мною записано немало понятных видео-уроков по освоению кистей и палитры, работы с рамками, текстурами, плагинами, формами и шрифтами. Главная задача – сразу правильно настроить интерфейс под свои потребности и приступить к изучению доступных функций.
- Если получившиеся на смартфоне или фотоаппарате фото не совершенны и нуждаются в коррекции, можно быстро улучшить фотографию. В этом помогут различные фильтры, позволяющие убрать с фотографии пятна, повысить резкость, исправить выдержку или цветовой баланс.
- В GIMP можно удалять фон с фотографии либо размыть его, оформить изображение текстом по кругу, сделать оригинальную аватарку, создать свою фактуру. Например, если необходимо вставить фотографию или изображение в рамку, можно воспользоваться этим подробным уроком.
- GIMP рационально использует память компьютера или ноутбука: редактор открыт для дополнений, новые фильтры и форматы легко добавить к уже имеющимся.
Painting
MyPaint Brush Tool
The new MyPaint Brush tool is now enabled by default. Daniel Sabo and Michael Natterer improved its performance and made MyPaint brushes available via an already familiar dockable dialog interface, with previews and tagging.
Jehan Pagès collaborated with the MyPaint team: he ported libmypaint to autotools, allowing, in particular, standard builds on all platforms, and work is being done to turn the default brushes into a separately shipped package.
Symmetry Painting
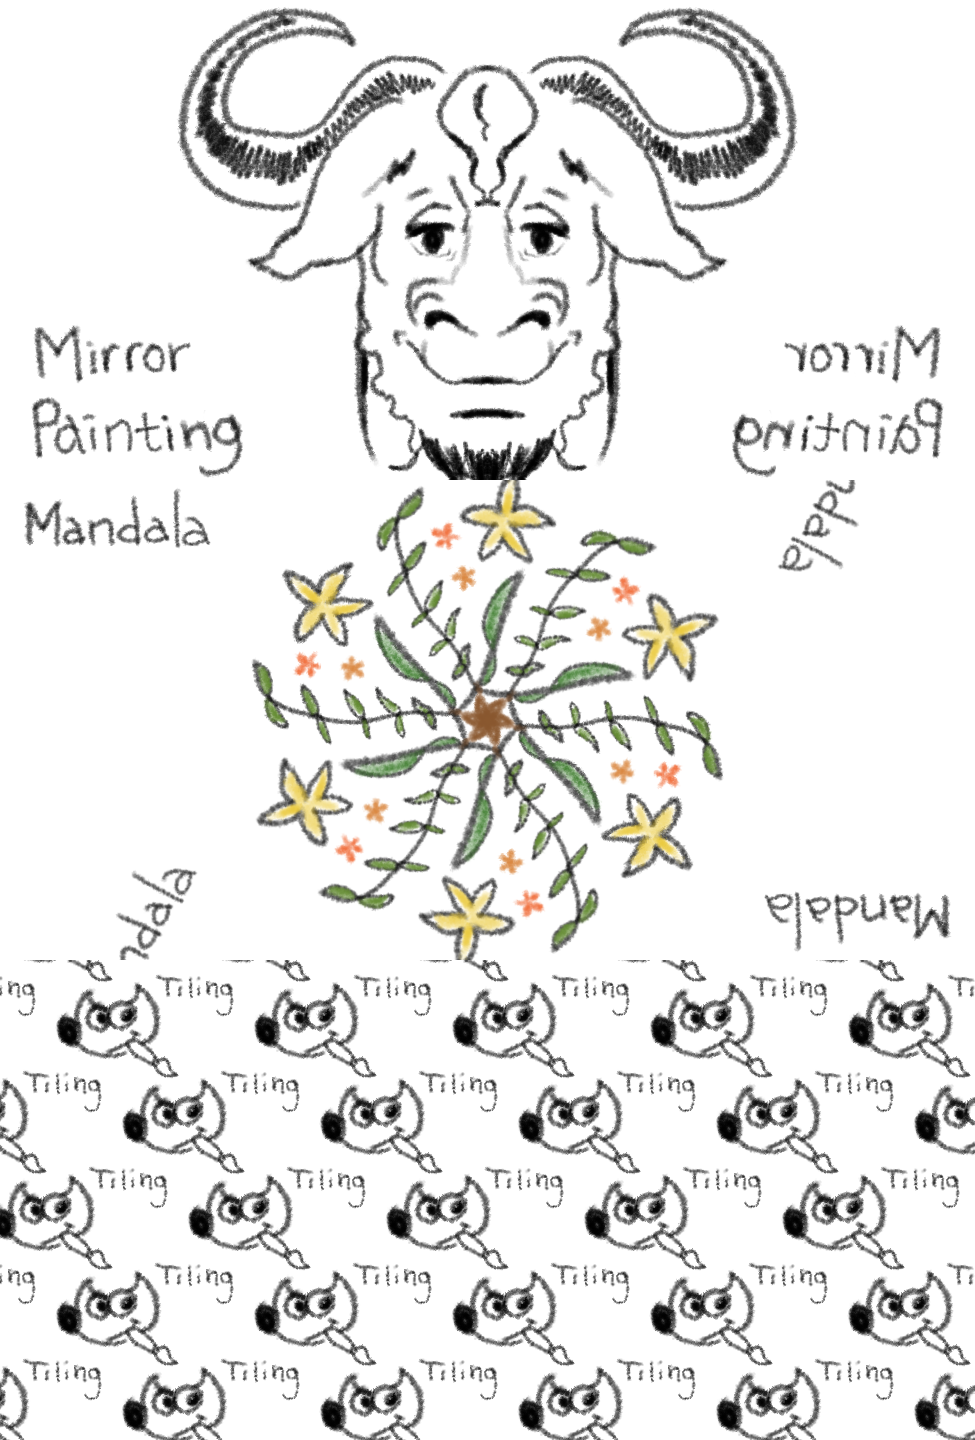
Another major new feature is symmetric painting mode, also developed by Jehan Pagès with financial support from the GIMP community. It can be activated through the new Symmetry Painting dockable dialog and allows to use all paint tools with various symmetries (mirror, mandala, tiling…).
- “Mirror” allows to paint with horizontal, vertical (axial), and/or central symmetry. The symmetry guides can be placed anywhere on canvas.
- “Mandala” is a rotational symmetry of any order. The center can be placed anywhere on canvas.
- “Tiling” is a translational symmetry, which can be finite (with a maximum of strokes) or infinite. In the latter case, it is the perfect tool to create patterns or seamless tiles, with instant rendering of what it will look like, at painting time.
Quick 1-minute test by Aryeom Han:
Tool Options
The mouse scroll-wheel action mappings have been improved, allowing, in combination with various modifiers, to do useful things on the currently selected tool’s options:
- : opacity increase/decrease;
- : aspect increase/decrease;
- : angle increase/decrease;
- : size increase/decrease;
- : spacing increase/decrease.
Note: the modifier is usually or , depending on your platform.
File formats support
GIMP is now capable of reading and writing TIFF, PNG, PSD, and FITS files with
up to 32-bit per channel precision where applicable.
The PSD plug-in additionally supports pass-through, hard mix, pin light, vivid
light, and linear light blending modes.
GIMP now also ships with native WebP support, including features like animation,
ICC profiles, and metadata. Both importing and exporting are supported.
The JPEG 2000 plug-in was rewritten to use the OpenJPEG library rather than
the somewhat obsolete Jasper library.
Finally, the PDF plug-in now supports importing password-protected files (you
need to know the password) and exporting multipage PDF documents (each layer
will be a page).
Contributors: Michael Natterer, Mukund Sivamaran, Ell, Jehan Pagès,
Lionel N, Darshan Kadu…
GEGL port, high bit depth support, multi-threading, and more
The ultimate goal for v2.10 was completing the port to GEGL image processing
library, started with v2.6 when we introduced optional use of GEGL for color
tools and an experimental GEGL tool, and continued with v2.8 where we added
GEGL-based projection of layers.
Now GIMP uses GEGL for all tile management and builds an acyclic graph for
every project. This is a prerequisite for adding non-destructive editing planned
for v3.2.
There are many benefits from using GEGL, and some of them you can already enjoy
in GIMP 2.10.
High bit depth support allows processing images with up to 32-bit per color
channel precision and open/export PSD, TIFF, PNG, EXR, and RGBE files in their
native fidelity. Additionally, FITS images can be opened with up to 64-bit per
channel precision.
Multi-threading allows making use of multiple cores for processing. Not all
features in GIMP make use of that, it’s something we intend to work on further.
A point of interest is that multi-threading happens through GEGL processing, but
also in core GIMP itself, for instance to separate painting from display code.
GPU-side processing is still optional, but available for systems with stable
OpenCL drivers.
You can find configuration options for multi-threading and hardware acceleration
in Edit > Preferences > System Resources.
Contributors: Michael Natterer, Øyvind Kolås, Ell, Jehan Pagès…
Features
We switched to a dark user interface theme and a symbolic icon theme by default
in version 2.10. If you absolutely want to revert it, here is what you do:
Go to and change the theme from Dark
to System.
Then go to and change the theme
from Symbolic to Legacy.
Changes will apply immediately. Click OK to confirm.
When will GIMP support HDR imaging and processing with 16bit per color channel precision?
GIMP 2.10 was released in April 2018 and is the first version of the program
to feature processing with precision of 16-bit and 32-bit per color channel.
Will GIMP open raw (.NEF, .CR2 etc.) files from my camera?
Starting with version 2.10, GIMP features plug-ins for using
darktable and
RawTherapee to process raw images, as well as a
preference for a default raw processing plug-in.
Yes, better support for CMYK has been on our roadmap for a long time. One of the
ideas, how we want to make this work, was introduced by user interaction
architect Peter Sikking at Libre Graphics Meeting 2009 and later —
in his two-part article in his company’s blog:
,
. Please
take some time to read up on that.
We needed to finalize transition to the new image processing engine, GEGL,
before attemtping to introduce features like CMYK support. Now that it is
complete, initial work on CMYK support has been done in the babl and GEGL
libraries that GIMP relies on. This is partially
funded by the GIMP community,
you can join in, too.
Once we finish some more work on color management in GIMP, it will be a good
idea to start exposing CMYK in the user interface. We have no timeline on this.
Also, please note that we are not planning advanced features such as GCR support
for now. This will most likely require a new dedicated developer in the team.
Should a new developer join the team to specifically work on
CMYK-related features, we will do our best to help him/her to complete this
project and get it to our users as soon as possible.
We realize that some changes are disruptive to some groups of users,
especially those who got used to GIMP as an image editor for doing quick fixes
to lossy files such as JPEG, PNG etc. (i.e. files that cannot store layers,
masks, custom channels, paths).
However, adding a switch for every change we make adds numerous levels of
complexity that we’d rather avoid. Additionally, it would lead to dramatically
changing the way we mean GIMP to work. Hence we respectfully disagree to make
extra behaviour switches.
At the same time, if you don’t wish to abandon GIMP completely, we recommend
having a look at the
Saver and Save/export clean plug-ins
by Akkana Peck, as well as at various GIMP forks on GitHub, although typically
they aren’t maintained up to date with regards to bugfixes.
Source for version 2.10 (Stable)
GIMP releases available from gimp.org and its mirrors contain the source code and have to be compiled in order to be installed on your system.
For instructions, how to build GIMP from source code, please see this page.
GIMP 2.10.28 is now available at https://download.gimp.org/mirror/pub/gimp/v2.10/. You may want to read the Release Notes for GIMP 2.10.
To allow you to check the integrity of the tarballs, here are the hashes of the latest releases:
-
gimp-2.10.28.tar.bz2
(sha256): - 4f4dc22cff1ab5f026feaa2ab55e05775b3a11e198186b47bdab79cbfa078826
-
gimp-2.10.24.tar.bz2
(sha256): - bd1bb762368c0dd3175cf05006812dd676949c3707e21f4e6857435cb435989e
-
gimp-2.10.22.tar.bz2
(sha256): - 2db84b57f3778d80b3466d7c21a21d22e315c7b062de2883cbaaeda9a0f618bb
-
gimp-2.10.20.tar.bz2
(sha256): - e12f9f874b1a007c4277b60aa81e0b67330be7e6153e5749ead839b902fc7b3c
-
gimp-2.10.18.tar.bz2
(sha256): - 65bfe111e8eebffd3dde3016ccb507f9948d2663d9497cb438d9bb609e11d716
-
gimp-2.10.16.tar.bz2
(sha256): - cbf9fe9534b913a9487b00cd9710cbc569bfd71fdd2f8c321547701a7d70cbeb
-
gimp-2.10.14.tar.bz2
(sha256): - df9b0f11c2078eea1de3ebc66529a5d3854c5e28636cd25a8dd077bd9d6ddc54
-
gimp-2.10.12.tar.bz2
(sha256): - 7d80b58e0784120d57d327294f6a1fda281ff51a61935c2cd764da281acaac71
-
gimp-2.10.10.tar.bz2
(sha256): - 12d1f243265c7aee1f2c6e97883a5c90ddc0b19b4346cf822e24adbb6c998c77
-
gimp-2.10.8.tar.bz2
(sha256): - d849c1cf35244938ae82e521b92b720ab48b8e9ed092d5de92c2464ef5244b9b
-
gimp-2.10.6.tar.bz2
(sha256): - 4ec8071f828e918384cf7bc7d1219210467c84655123f802bc55a8bf2415101f
-
gimp-2.10.4.tar.bz2
(sha256): - ffb0768de14a2631b3d7ed71f283731441a1b48461766c23f0574dce0706f192
-
gimp-2.10.2.tar.bz2
(sha256): - 1cb0baaecdefe44d371a15f2739a1bcbce4682336b4ccf8eb7b587ce52c333eb
-
gimp-2.10.0.tar.bz2
(sha256): - 7fcc96fb88cb0a0595d2610f63a15dec245bb37bf9db527d37a24fb75e547de2
GIMP help files are available at https://download.gimp.org/mirror/pub/gimp/help/.
Please consider using one of the mirrors listed below.
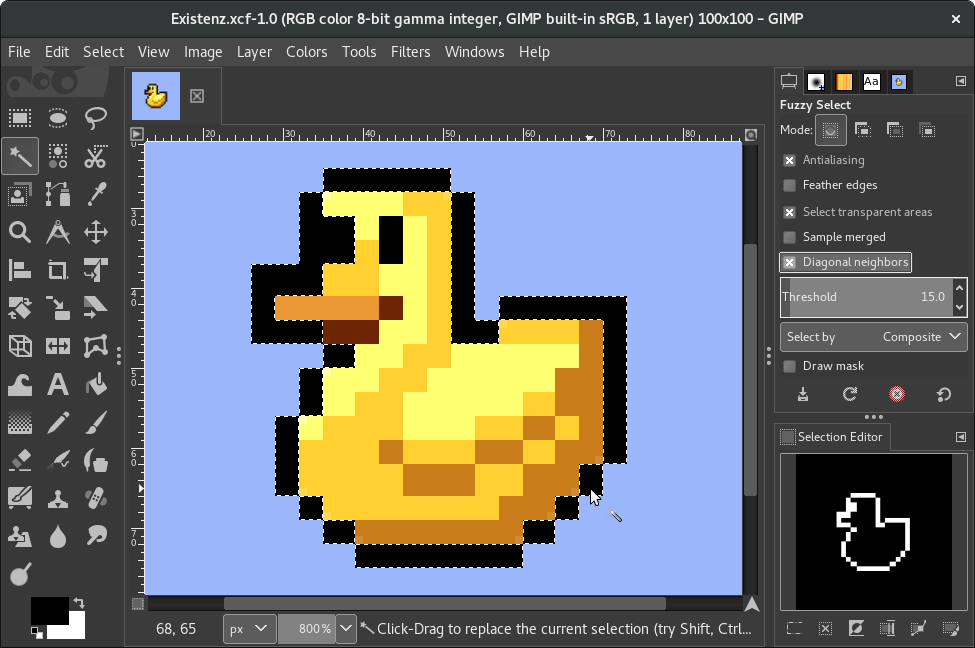
Better Tools
The Fuzzy Select and Bucket Fill tools got a new feature for selecting/filling diagonally neighboring pixels.
The Blend tool got shapeburst fills resurrected, and allows the placement of their handles on the canvas, outside of the image area. Additionally, the Blend tool now displays its progress thanks to a new GEGL feature available in several GEGL operations including .
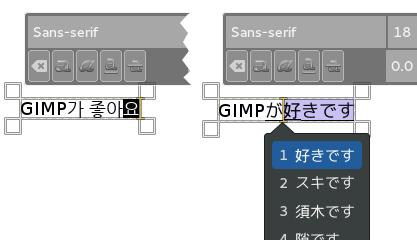
The Text tool now fully supports advanced input methods for CJK and other non-western languages. Minimal support already existed, but the pre-edit text was displayed in a floating pop-up instead of inline, within the text tool box, and without any preview styling. It is now displayed just as expected, depending on your platform and Input Method Engine. Several input method-related bugs and crashes have also been fixed.
Improved import policies
Color Profile Policy now exposes a new choice “Convert to Preferred
Profile” and the import dialog default “Convert” action will convert
the image to the preferred profile (if any was set, otherwise it falls
back to the built-in profile). Converting to the built-in profile will
still be available as a secondary action. If you want to always work with
a given profile, you can set up your preferred workflow as soon as importing
is done.
Moreover, a new Metadata Rotation Policy is exposed in the Preferences
dialog, next to the Color Profile Policy (in page ) with 3 options: “Ask what to do”, “Discard metadata
without rotating”, and “Rotate the image then discard metadata”.
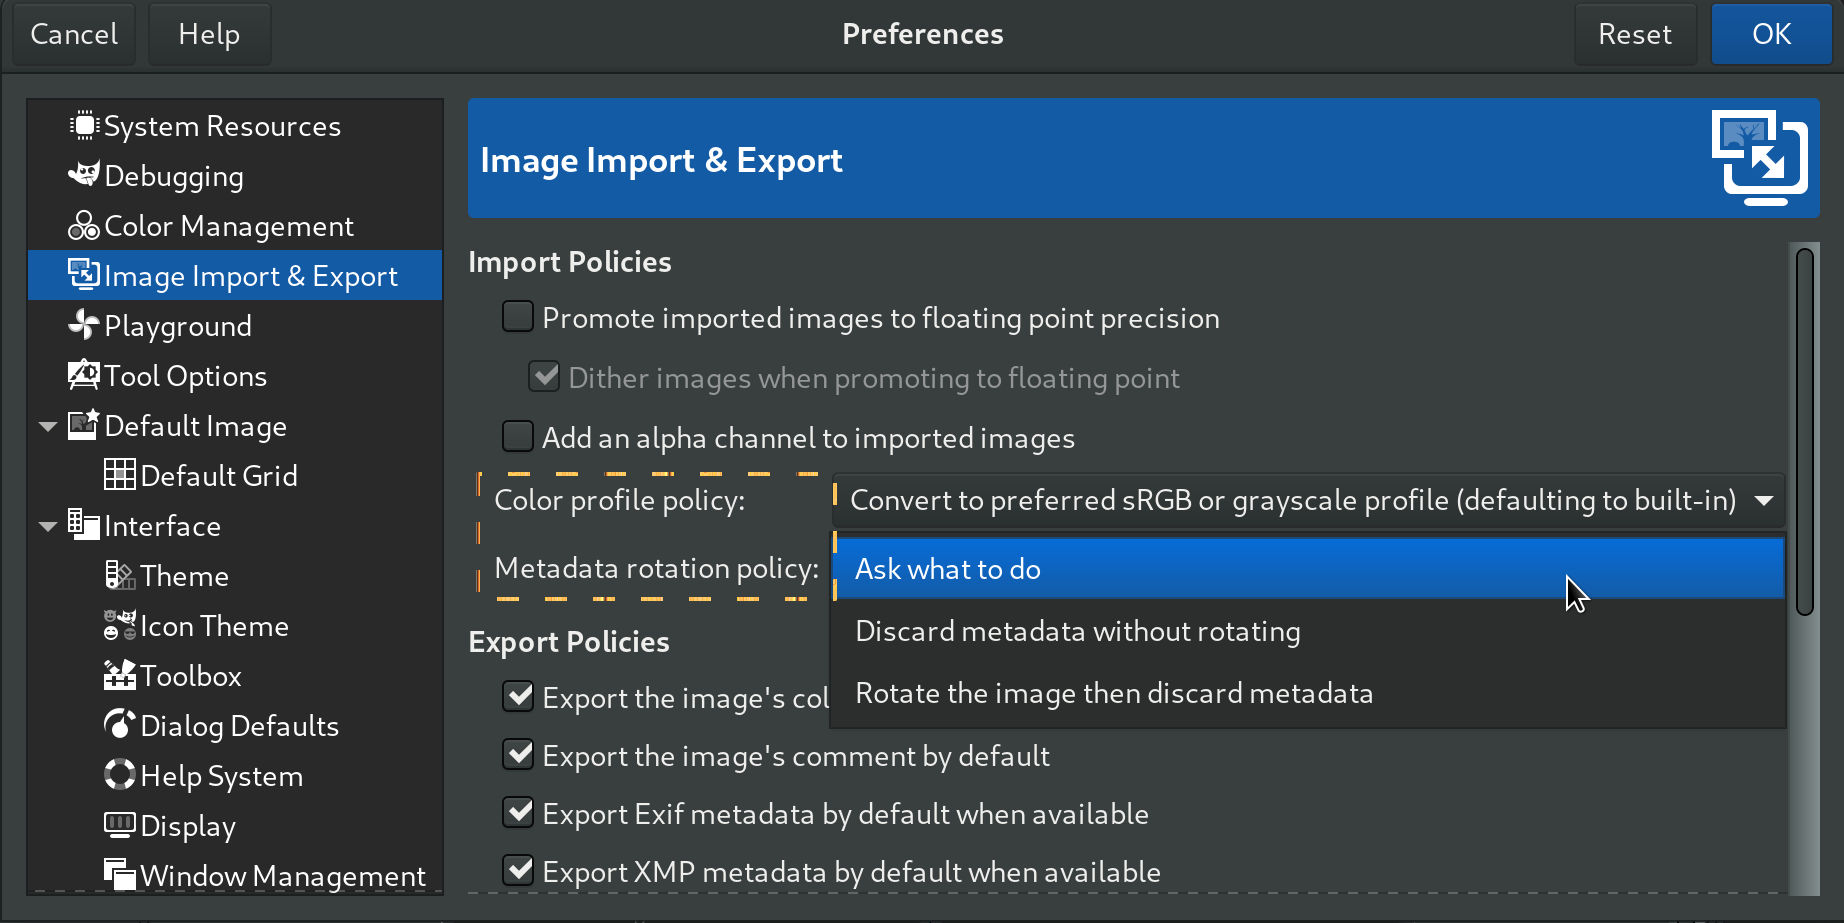 Updated Color Profile policy and new Metadata rotation policy
The metadata rotation policy used to be handled on the API side, with
a dialog generated by and saved in a global parasite.
The whole logics and GUI has been moved as core logics, similar to the
“Color Profile Policy”. This implies that plug-ins don’t even need to
handle this as it will happen as specified by the user automatically
on every new import.
Status: done.
GIMP for Unix-like systems
The flatpak link above should open your software installer and prompt you to install GIMP (available platforms: i386, x86-64, ARM and AArch64). It may not work out-of-the-box on some platforms since the flatpak technology is new. If that is the case, ensure flatpak is installed and if clicking the link still does not prompt to install GIMP, then manually install by command line:
The flatpak build is very new and therefore may have shortcomings. It’s very likely your Unix-like system distribution already comes with a GIMP package. It is the preferred method of installing GIMP, as the distribution maintainers take care of all the dependencies and bug fix updates. Nevertheless, note that many distros decide to pin a specific version of GIMP to their releases, whereas our flatpak will follow GIMP releases closely.
GIMP can also run on Solaris and is available for the BSD family of systems such as FreeBSD and OpenBSD.
Introduction to GIMP
GIMP is an acronym for GNU Image Manipulation Program. It is a freely distributed program for such tasks as photo retouching, image composition and image authoring.
It has many capabilities. It can be used as a simple paint program, an expert quality photo retouching program, an online batch processing system, a mass production image renderer, an image format converter, etc.
GIMP is expandable and extensible. It is designed to be augmented with plug-ins and extensions to do just about anything. The advanced scripting interface allows everything from the simplest task to the most complex image manipulation procedures to be easily scripted.
GIMP is written and developed under X11 on UNIX platforms. But basically the same code also runs on Windows and macOS.
Как пользоваться инструментами редактирования GIMP
Рассматриваемый графический редактор характеризуется набором полезных инструментов для профессионального редактирования и обработки фотографий и картинок.
1. В главном меню доступно управлением изображением на глобальном уровне. Здесь переключаются окна, слои, цветовая гамма, фильтры – стандартные для работы инструменты.
2. С помощью следующего меню мастер переходит между фотографиями, который открыты в программе, для вставки или слияния.
3. Панель инструментов содержит полезный набор функций, чтобы выделить область, повернуть и увеличить изображение или текст, изменить цвет, закрасить отдельные элементы и так далее. Чтобы воспользоваться всплывающей подсказкой, наводим указатель мыши (курсор) на инструмент и ждем 1-2 секунды – программа отобразит наименование функции.
4. После выбора инструмента открывается соответствующее меню для настройки параметров выбранной функции. Для кисти – толщина, цвет, варианты закраски, для текста – шрифт, размер и так далее.
5. В правом верхнем меню также содержатся кисти, текстуры и шрифты.
6. Следующий раздел обрабатывает слои, цветовые каналы и выделенные контуры.
Donate to the Project
The GNOME Foundation has graciously agreed to act as fiscal agents for us. Contributions to the GIMP project can be made by donating to the GNOME Foundation and specifying the GIMP project as the recipient. The GNOME Foundation is a tax-exempt, non-profit 501(c)(3) organization and all donations are tax-deductible in the USA.
So far donation through GNOME Foundation can only be used for community needs (conferences, developer meetings… see ) and material renewal. .
You can choose from several options to support GIMP financially:
Financial help is needed for different reasons. The annual Libre Graphics Meeting is one of these things. It helps to get as many GIMP Developers to the conference as possible, so that we can do face-to-face team meetings, plan further development, fix bugs, and write new features.
If applicable, please specify whether you want to remain anonymous. While we usually don’t publish the names of donors, this may be considered for exceptional donations.
Many thanks to all our sponsors!
Paypal
Donate to gimp@gnome.org, this will notify us, and the GNOME board, that funds have been donated to the GIMP project. Credit card donations are also accepted via this route.
Liberapay
Donate to GIMP on Liberapay. Liberapay is a platform run by a non-profit organization allowing monthly crowdfunding (subscription based). See Wikipedia’s page on Liberapay.
Flattr
Donate to GIMP with Flattr. Flattr is a microdonation system. Users are able to pay a small amount every month (minimum 2 euros) and then click Flattr buttons on sites to share the money they paid among those sites, comparable to an Internet tip jar (for more details see Wikipedia’s Flattr article).
Bitcoin
Bitcoin (BTC) is an online digital currency that is based on an open-source, peer-to-peer encryption protocol first described in 2009 by a pseudonymous developer (or developers) Satoshi Nakamoto. Bitcoin is not managed by any government or central authority. Instead, it relies on an Internet-based network (for more details see Wikipedia’s Bitcoin article).
Bitcoin address: 1NVMCeoBfTAJQ1qwX2Dx1C8zkcRCQWwHBq
Cheque
Cheque, made payable to the GNOME Foundation, and sent to:
GNOME Foundation
#117
21 Orinda Way Ste. C
Orinda, CA 94563
USA
with a cover-letter (or a note in the “memo” field) saying it is for the GIMP project.
Multi-threading preferences now available from plug-ins
The Preferences dialog proposes a “Number of threads to use” setting,
allowing people to customize the thread usage (defaulting to system
threads detection). This was only used by core processing until now. We
now make this setting available to plug-ins too through the
API function, hence allowing plug-ins to
follow user preferences.
The HEIF/AVIF plug-in now uses this function (it was already
multi-threaded, yet was using system threads discovery with no way to
override the settings until now). The JPEG2000 loading code, which was
single-threaded until now, has been ported to use this new function,
hence decoding images much faster.