Помощь и поддержка
Содержание:
- Как пользоваться Tracert?
- PingPlotter
- Трассировка маршрута
- Prerequisites
- Объективы трассировки
- How to Run a Traceroute on a Windows 10 Computer
- What Is Traceroute?
- Traceroute options for Linux
- How to use the Traceroute command?
- Где используется
- Free Ping and Traceroute Tool
- Traceroute IPv4 and IPv6
- Paessler Traceroute Hop Count Sensor with PRTG (FREE TRIAL)
- Синтаксис команды Tracert
- Как работает команда Tracert или Traceroute
- Traceroute Directory
- How to Read Traceroute Results
- Ping vs Traceroute: In-Depth Traceroute Explanation
- Summary
- traceroute Tools & tracert FAQs
- What does a route issue mean?
- What is the difference between Traceroute and Tracepath?
- Why is Traceroute so slow?
- Анализатор пути Pro
- Tracert Parameters
- Analyzing Tracert Results
- Синтаксис и основные ключи утилиты route
Как пользоваться Tracert?
Для примера проследим путь от моего ПК до сайта Google. В командной строке ввожу:
- tracert google.com – для систем на базе Windows
- traceroute google.com – для систем на базе Linux и Mac OS
Вместо доменного имени вы можете также ввести ip-адрес удаленного сервера.
После запуска команды (по нажатию клавиши ENTER) наш ПК отправит три пакета данных каждому маршрутизатору на пути к месту назначения. Каждый из них в свою очередь сразу после получения пакетов отправит их обратно на наш компьютер и сообщит информацию о себе, например IP-адрес.
Также маршрутизатор укажет время, измеренное в милисекундах, за которое три пакета данных прошли к нему и от него. Рассмотрим полученные результаты.
В крайнем левом столбце указано количество hops (хопов, узлов, прыжков) пройденных до пункта назначения. Следующие три столбца показывают время прохождения каждого пакета данных до каждого узла и обратно.
Как видим, на первом этапе передача пакетов произошла менее чем за 1 ms. Первой точкой перехода был мой домашний модем-роутер (маршрутизатор). Этот маршрут самый короткий и быстрый, поскольку он проходит в пределах моей локальной сети. Но как только данные попадают в Интернет (второй прыжок), время приема-передачи значительно увеличивается. И чем дальше пакеты данных должны пройти к каждому маршрутизатору, тем больше времени будет затрачено на это.
Достижение конечного пункта назначения будет самым длительным этапом. Его значение будет соответствовать результату, полученному при помощи команды Ping. Потому что, как вы помните, ping отображает только время достижения конечного пункта на пути следования пакетов данных.
Последний столбец отчета traceroute сообщает IP-адрес или доменное имя каждого встреченного маршрутизатора.
PingPlotter
PingPlotter — еще одно из лучших программ для трассировки и составления карты маршрутов для вашего сетевого трафика. Благодаря этому инструменту мы можем обнаруживать и проверять проблемы, связанные с маршрутом и скоростью, с помощью предупреждений и условий. Мы можем считать это полезным для целей сетевого мониторинга.
Также мы можем настроить условия, которые начинают регистрироваться, как только возникают проблемы с маршрутизацией. Таким образом мы можем записывать любые отклонения от нормальных рабочих процедур в нашей сети и обнаруживать ненормальное поведение.
Кроме того, в нем есть графики, которые упрощают визуализацию и понимание проблем более простым и интуитивно понятным способом. У нас есть 14-дневная пробная версия. Затем мы можем выбрать стандартную версию, предназначенную для небольших компаний и домашних пользователей, и другую профессиональную версию, предназначенную для крупных компаний. Его можно загрузить для операционной системы Windows с сайта здесь .
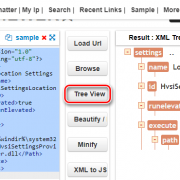
Трассировка маршрута
Использование утилиты «Tracert».
Рассмотрим пример работы программы в операционной системе Windоws. Программа tracert выполняет отправку данных указанному узлу сети, при этом отображая сведения о всех промежуточных маршрутизаторах, через которые прошли данные на пути к целевому узлу. В случае проблем при доставке данных до какого-либо узла программа позволяет определить, на каком именно участке сети возникли неполадки. Здесь хочется отметить, что программа работает только в направлении от источника пакетов и является весьма грубым инструментом для выявления неполадок в сети. В силу особенностей работы протоколов маршрутизации в сети Интернет, обратные маршруты часто не совпадают с прямыми, причем это справедливо для всех промежуточных узлов в трейсе. Поэтому ICMP ответ от каждого промежуточного узла может идти своим собственным маршрутом, затеряться или прийти с большой задержкой, хотя в реальности с пакетами, которые адресованы конечному узлу, этого не происходит. Кроме того, на промежуточных маршрутизаторах часто стоит ограничение числа ответов ICMP в единицу времени, что приводит к появлению ложных потерь.
Запуск программы производится из командной строки. Для этого вы должны войти в неё. Для операционных систем семейства Windows существует несколько способов запуска командной строки:
1. Пуск — Выполнить — В графе «Открыть» написать «cmd» и нажать Ок.
2. Сочетание клавиш Win (кнопка с логотипом Windows) + R (должны быть нажаты одновременно) — В графе «Открыть» написать «cmd» и нажать Ок.
3. Пуск — Все программы (или просто «Программы», зависит от версии операционной системы) — Стандартные — Командная строка.
Далее вам необходимо произвести трассировку до заданного ip адреса или доменного имени.


Использование утилиты «Pathping
PathPing предоставляет информацию о латентности сети и потерях данных на промежуточных узлах между исходным пунктом и пунктом назначения. Команда pathping в течение некоторого периода времени отправляет многочисленные сообщения с эхо-запросом каждому маршрутизатору, находящемуся между исходным пунктом и пунктом назначения, а затем на основании пакетов, полученных от каждого из них, вычисляет результаты. Поскольку pathping показывает коэффициент потери пакетов для каждого маршрутизатора или связи, можно определить маршрутизаторы или подсети, имеющие проблемы с сетью. Команда pathping выполняет эквивалентное команде tracert действие, идентифицируя маршрутизаторы, находящиеся на пути.
Запуск программы производится из командной строки. Для этого вы должны войти в неё. Для операционных систем семейства Windows существует несколько способов запуска командной строки:
1. Пуск — Выполнить — В графе «Открыть» написать «cmd» и нажать Ок.
2. Сочетание клавиш Win (кнопка с логотипом Windows) + R (должны быть нажаты одновременно) — В графе «Открыть» написать «cmd» и нажать Ок.
3. Пуск — Все программы (или просто «Программы», зависит от версии операционной системы) — Стандартные — Командная
Внимание! Выполнение данной команды потребует некоторое время, необходимо дождаться полного выполнения, как указано в примере ниже

Копирование текста из командной строки.

Чтобы скопировать текст к кликаем правой кнопкой мышки по командной строке и вызываем контекстное меню. В открывшемся меню выбираем пункт «Пометить». После этого текст в командной строке можно выделить обычным движением мышкой и скопировать с помощь комбинации клавиш Ctrl+C.
Далее результаты необходимо будет переслать на электронный адрес почты 911@profintel.ru, с указанием вашего id номера и кратким описанием вашей проблемы.
Prerequisites
Requirements
Readers of this document should have basic knowledge of one of these operating systems:
-
Cisco IOS Software
-
Linux
-
Microsoft Windows
Components Used
The information in this document applies to these software and hardware versions:
-
Cisco Router that runs Cisco IOS Software Release 12.2(27)
-
PC that runs Red Hat Linux version 9
-
PC that runs MS Windows 2000
The information in this document was created from the devices in a specific lab environment. All of the devices used in this document started with a cleared (default) configuration. If your network is live, make sure that you understand the potential impact of any command.
Объективы трассировки
Существует три цели этого инструмента трассировки, который дает представление о проблеме пользователя в сети:
- Весь путь, по которому проходит пакет.
- Имена и идентификационные данные маршрутизаторов и устройств на пути пользователя.
- Сетевая задержка или, точнее, время, необходимое для отправки и получения данных на каждое устройство по маршруту.
Трассировщик покажет предел того, сколько строк хмеля он будет отображать, а именно 30 хмелей, это считается максимальным числом.
Ниже приведен список символов с описанием, которые появятся в выводе команды traceroute:
| Командный символ трассировки | Описание |
|---|---|
| Nn msec | Обратный ход (в миллисекундах) для указанного количества зондов. |
| * | Зонд выключен. |
| A | Административно запрещено |
| Q | Успокоительное средство для источника |
| I | Пользовательский прерванный тест |
| U | Порт недоступен |
| H | Хост недоступен |
| N | Сеть недоступна |
| P | Протокол недоступен |
| T | Таймаут |
| ? | Неизвестный тип пакета |
Однако, помимо всего этого, у трассировки есть ограничения. Traceroute обнаруживает пути не на уровне маршрутизатора, а на уровне интерфейса. Это может также указывать на путь, которого на самом деле не существует для того, чтобы минимизировать проблему, есть Париж-трассировка, которая служит модификацией трассировки. Это помогает поддерживать идентификатор потока зондов, чтобы избежать балансировки.
How to Run a Traceroute on a Windows 10 Computer
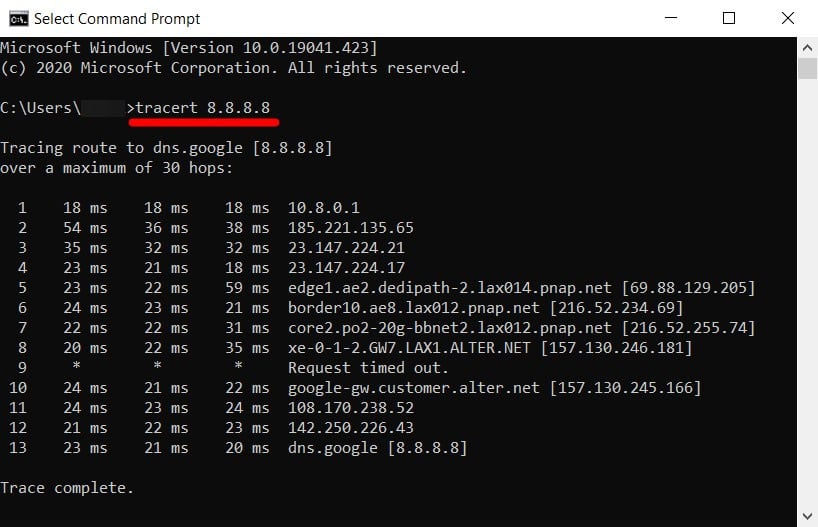
To run a traceroute on a Windows 10 computer, open the Windows search box and type CMD into the search bar. Then open the Command Prompt app and type in tracert followed by a space and then the destination URL or IP address. Finally, hit Enter.
- Open the Windows search box. You can do this by clicking the magnifying glass icon in the bottom-left corner of your screen.
- Then type CMD in the search bar and click Open.
- Next, type tracert followed by a space and then an IP address or URL. If you just want to test your internet connection, it is a good idea to run a traceroute to 8.8.8.8 (Google’s DNS server). You can also run a traceroute to the URL of any website or IP address. Just make sure you leave a space after tracert and before the URL or IP address. For example, to run a traceroute to HelloTech.com, you would type tracert hellotech.com into the Command Prompt app.
- Finally, press Enter on your keyboard and wait for the traceroute to finish. You will see the words Trace complete when the process is finished. You can also stop a traceroute at any time by pressing the Control + C keys on your keyboard at the same time.
To copy the traceroute results, left-click and drag your mouse to select the traceroute results. Then press Enter on your keyboard. Next, open a document or text file and paste the traceroute results there.

What Is Traceroute?
Traceroute is a network diagnostic tool that tracks the path of a packet of data as it travels from your computer to a destination over the internet. Running a traceroute lets you see where your connection is slow or unresponsive.
You can think of the traceroute tool like a traffic map of your internet connection. When you run a traceroute, you will see all the “hops,” or routers that three separate packets are pushed through on their way to a destination. It will also show you your network’s latency, or how long it took for each packet to travel from one hop to the next.
If you just want to test your network’s latency, check out our step-by-step guide on how to do a ping test on your Windows 10 computer.
Traceroute options for Linux
If you are a Linux user (Ubuntu, Linux Mint, Manjaro, Red Hat, Debian, etc.), you can specify your traceroute command with the following options:
|
Option |
Description |
|
–help |
Information about the command. |
|
-d |
This command enables debugging on Linux. |
|
-F |
Forbid fragmentation. |
|
-f first_ttl |
Put the first TTL value of the packet. |
|
-g gateway |
Define a loose source route gateway. |
|
-i interface |
Set the interface for the probes. |
|
-m max_ttl |
The TTL in traceroute means the maximum amount of hops. |
|
-N |
The number of probes that are sent at the same time (simultaneously). |
|
-n |
Stop the resolving of the IP addresses. |
|
-p port |
Define the port for the query. |
|
-t |
Set the type-of-service in probes. |
|
-w waittime |
Maximum waiting time for each of the replies. |
|
-q nqueries |
Set the number of queries. The default value is 3. |
|
-r |
Bypass the routing tables and send them to the host directly (on an attached network only). |
|
-S srcaddr |
IPv6 only – source address. |
|
-e |
Show ICMP extensions. |
|
-A |
AS lookups enable for each hop. |
|
-V |
Show version. |
|
-U |
Use a particular UDP port. The default value is 53. |
|
-UL |
Use the UDPLITE for the query. |
| -P protocol |
Send packets of a specified IP protocol. |
|
-I |
Use the ICMP echo for the requests. |
|
-T |
Use the TCP SYN for the requests. |
| -4 |
Use only IPv4 addresses |
| -6 |
Use only IPv6 addresses |
How to use the Traceroute command?
Use the traceroute command by writing the command “traceroute + domain.com / IP address” or, in the Terminal on Linux and macOS or “tracert + domain.com / IP address” in the Command Prompt on Windows.
Traceroute (Linux and macOS)
traceroute domian.com or traceroute 12.23.34.45
Tracert (Windows)
tracert domian.com or tracert 12.23.34.45
On macOS, you can also use the Traceroute utility. Press the command button + space. Then write Network Utility. Inside it, navigate to Traceroute. Write the hostname or IP address and press enter. It will show you the result.
*You can change the domain.com with another domain you want to probe, and the same goes for the IP address.
Some differences between the Traceroute command, and the Tracert exist. Check the options below.
Где используется
Применяется для диагностики сетевых сбоев. Позволяет определить:
- Где произошла блокировка недоступного сайта: у провайдера или за его пределами;
- Место сбоя с нужного маршрута;
- Является ли ресурс подлинным.
Команда трассировки в CMD
Задумывались ли вы как идет сигнал от ПК к сайту? Чтобы узнать, используйте команду TRACERT. Рассмотрим на примере как мы ходим на сайт https://public-pc.com/. Запускаем командную строку. Нажимаем комбинацию клавиш «Win+R». В открывшемся окне пишем «cmd».
Пишем команду: TRACERT public-pc.com. Отобразится результат ее выполнения. Главное, чтобы количество посланных пакетов совпадало с полученными. Без потерь. Посмотрите, чтобы адрес места назначения совпал с адресом конечной точки.
Как разобраться с результатом
Команда трассировки маршрута TCP отобразит весь путь, прошедший сетевым пакетом до узла назначения. В нашем примере запрос к сайту сделал четырнадцать переходов, прошел 13 пунктов. Четырнадцатым шагом достиг результата. По умолчанию максимальное количество переходов тридцать. Во 2, 3, 4 столбце содержится информация о времени с момента отправки пакета, и до получения ответа. В последнем столбце отображаются имена и адреса узлов.
Участки, на которых время отклика самое маленькое говорит, что канал не перегружен, информация проходит без задержек. На узлах с большим временем отклика будет написано, что превышено время ожидания. Означает, что или сайт временно недоступен, или проблема у провайдера. Если прописать команду без сайта, появится справка о параметрах.
Free Ping and Traceroute Tool

ManageEngine is another major producer of infrastructure management. Its Free Ping and Traceroute Tool combines the facilities of these two well-known network administration commands to bring you insights into your network and connections across the internet. This free tool can be installed on Windows or on Linux.
The base display in the GUI dashboard shows the Traceroute output in a table. For each hop, you will see probes that timed out and the round-trip time. You will also get reports on the end-to-end transmission speed of the link.
You can drill down on reach router record and launch a Ping session for it, monitoring the performance of that device in greater detail. This lightweight free tool gives you a fast and useful service for troubleshooting the quality of your connections.
Traceroute IPv4 and IPv6
By default, tracert and traceroute will test the path only for IPv4 addresses. But that doesn’t mean you can’t test IPv6. All modern OSs come with full support for IPv6 addresses, including all commands, such as ping, traceroute, netstat, etc., to support IPv6.
But IPv4 is the preferred addressing method, so you might not have IPv6 routes in your router ready to send the ICMP packet towards the IPv4 destination. If you do have IPv6 routes support in your OS and your router, you can perform a test.
To test a route for an IPv6 address, use the “tracert6” or “traceroute6” for Linux OS. The tracert6 command sends a sequence of User Datagram Protocol (UDP) to the destination host. While in the case of Windows, you can traceroute to IPv6 addresses using “tracert -6”.
- For macOS and Linux: traceroute6 2a00:1450:400a:804::2004
- For Windows: tracert -6 2a00:1450:400a:804::2004
Paessler Traceroute Hop Count Sensor with PRTG (FREE TRIAL)

Paessler PRTG is a very large and comprehensive infrastructure monitoring tool. It covers all aspects of your system and the company ships the whole bundle no matter which modules you actually want to use. The system is made up of a collection of “sensors” and the price you pay for a license depends on how many sensors you activate, so you can tailor the monitor to just cover one aspect of your network. Traceroute Hop Count Sensor is one of the available sensors.
The results page shows each link on a separate page. You get to see the roundtrip time averaged over many runs with the minimum and maximum time for a group of probes up to the present time. The link between hops is maintained through a common parent tag.
Tagging is registered in a hierarchical structure with inheritance built in, so if you set up tags to mark connections, all of the hops in the connection will inherit the connection’s tag. This helps you group, aggregate, and sort data once you get Traceroute data into the data viewer. PRTG also includes a Ping sensor and packet capture sensors, and all of the different sensors will interact, so you can relate conditions discovered by one sensor with data collected by another.
The customizable dashboard enables you to create accounts with different views and controls for different team members. This will enable you to delegate tasks safely.
A great thing about Paessler PRTG is that you don’t have to pay for it if you only activate up to 100 sensors. So, if you just want to use its Traceroute, you can use it free of charge. You can also get a 30-day free trial of the full system. There is also a hosted version available. The on-site version installs on Windows Server.
Синтаксис команды Tracert
ЬгасегЬ -d -час MaxHops -w TimeOut -4 -6 цель /?
Совет: См. «Как прочитать командный синтаксис», если вам трудно понять синтаксис tracert, описанный выше или в приведенной ниже таблице.
| -d | Эта опция запрещает трассировать от разрешения IP-адресов на имена хостов, что часто приводит к гораздо более быстрым результатам. |
| -час MaxHops | Этот параметр tracert указывает максимальное количество переходов в поиске цель , Если вы не указали MaxHops , и цель не был найден 30 прыжками, tracert перестанет смотреть. |
| -w TimeOut | Вы можете указать время в миллисекундах, чтобы разрешить каждый ответ до таймаута, используя этот параметр tracert. |
| -4 | Этот параметр заставляет tracert использовать только IPv4. |
| -6 | Этот параметр заставляет tracert использовать только IPv6. |
| цель | Это назначение, либо IP-адрес, либо имя хоста. |
| /? | Используйте переключатель справки с помощью команды tracert, чтобы показать подробную справку о нескольких параметрах команды. |
Другие менее часто используемые параметры для команды tracert также существуют, в том числе -j Список_адресов , -Р, а также -S Адрес источника . Для получения дополнительной информации об этих параметрах используйте ключ справки с помощью команды tracert.
Совет: Сохраните длинные результаты команды tracert в файл с помощью оператора перенаправления. Посмотрите, как перенаправить вывод команды в файл или получить подсказки командной строки для этого и других полезных советов.
Как работает команда Tracert или Traceroute
Диагностическая команда Tracert определяет маршрут до пункта назначения, введенного путем отправки пакетов «эхо-сигнала ICMP», используя протокол управляющих сообщений Интернета, известный как «ICMP», к месту назначения хоста. Эти отправляемые пакеты используют значения времени жизни по умолчанию (TTL), которые мы указываем с помощью параметров команды Tracert.
Когда мы отправляем пакет данных, маршрутизаторы уменьшают этот TTL пакета на одну единицу, прежде чем переслать пакет в следующую точку пути. Таким образом, благодаря TTL мы можем узнать количество «прыжков», которые пакет передал из источника в пункт назначения. Однако, когда TTL пакета достигает нуля, не достигая своего конечного пункта назначения, маршрутизатор возвращает сообщение ICMP «Timeout» на устройство-источник.
Команда Tracert сначала отправляет пакет «ICMP echo» с TTL, равным 1, и увеличивает TTL на 1 при каждой последующей передаче, пока не достигнет конечного пункта назначения или пока не будет достигнут максимальный TTL. Благодаря промежуточным маршрутизаторам, которые возвращают сообщение ICMP «Timeout», мы можем знать маршрут, по которому идет пакет данных, отправленный с нашего компьютера на хост назначения. Однако может случиться так, что некоторые маршрутизаторы отправляют пакеты TTL «Timeout» без предупреждения, и эти пакеты невидимы для команды Tracert.
Как только мы это узнаем, мы можем понять, что команда Tracert работает, отображая на экране упорядоченный список промежуточных маршрутизаторов, которые возвращают сообщение ICMP об истечении времени ожидания. Давайте рассмотрим пример, введя команду Tracert www.redeszone.net в консоли командной строки:
На изображении выше команды Tracert на нашем веб-сайте www.redeszone.net мы видим, что для того, чтобы добраться до конечного веб-сервера, вам нужно сделать восемь прыжков. Кроме того, в каждом прыжке он показывает нам минимальное, среднее и максимальное время каждого скачка пакета данных. В этом конкретном случае мы можем видеть, как некоторые из этих данных не предоставляют их, и именно поэтому он показывает звездочку.
Traceroute Directory
By Country
| Viafacil (AS16814) |
| SubiTuWeb (AS18747) |
| Australia |
|---|
| Hafey.Org (AS10145) |
| Austria |
|---|
| Globedom (AS12401) |
| nemox.net (AS31394) |
| Brazil |
|---|
| Registro.br (AS22548) |
| Canada |
|---|
| Network Tools (AS10577) |
| Cyprus |
|---|
| ThunderWorx (AS13033) |
| Czech Republic |
|---|
| SilesNet (AS702) |
| Network Server Monitor (AS15685) |
| Denmark |
|---|
| Azero (AS9167) |
| France |
|---|
| SDV (AS8839) |
| WZ-Conseil (AS29402) |
| Germany |
|---|
| HanNet (AS1275) |
| SpaceNet (AS5539) |
| Plusserver (AS8972) |
| InterNetWire (AS13246) |
| TELTA Citynetz Eberswalde (AS21032) |
| Kloth.Net (AS24940) |
| Insode (AS24940) |
| Gaertner Datensysteme (AS24956) |
| interscholz Internet Servivces GmbH & Co. KG (AS33843) |
| Kosten (AS33984) |
| Greece |
|---|
| Athens University of Economics and Business (AS5408) |
| University of Ioannina (AS8581) |
| Hong Kong |
|---|
| Powerbase (AS9925) |
| Iceland |
|---|
| RHnet — Iceland University Research Network (AS15474) |
| Indonedia |
|---|
| MCM Net (AS 38211) |
| Italy |
|---|
| Bilink (AS8816) |
| Sysnet (AS12474) |
| Japan |
|---|
| CTNet Computer Communication Network (AS7670) |
| Kyrgyzstan |
|---|
| ElCat (AS8449) |
| Lithuania |
|---|
| BITE Internet (AS13194) |
| Luxembourg |
|---|
| FMC Consulting (AS13049) |
| The Netherlands |
|---|
| NXS (AS16237) |
| Transip B.V. (AS20857) |
| Pakistan |
|---|
| Nexlinx (AS17563) |
| Poland |
|---|
| Internet Partners (AS6714) |
| dhosting.pl (AS48896,AS31116) |
| Romania |
|---|
| ZYX (AS8708) |
| Gazduire Web Ltd. (AS25116) |
| Russia |
|---|
| TeliaNet Russia (AS1299) |
| Singapore |
|---|
| NewMedia Express (AS38001) |
| SingTel Internet Exchange (AS7473) |
| Slovakia |
|---|
| Rhenus Logistics (AS48326) |
| Sweden |
|---|
| Wiberg (AS8642) |
| Switzerland |
|---|
| Init7 (AS13030) |
| Antares Kommunikationstechnik (AS34554) |
| Taiwan |
|---|
| HiNet (AS3462) |
| EBIX (AS17709) |
| United Kingdom |
|---|
| Enta (AS8468) |
| Cerberus Networks Ltd (AS51918) |
| United States |
|---|
| Princeton University (AS88) |
| Cogent (AS174) |
| T1 Shopper (AS2914) |
| Global Crossing (AS3549) |
| netINS (AS5056) |
| InterWorld Communications, Inc (AS5726) |
| NETPLEX (AS6062) |
| Opus One (AS6373) |
| Fifi.Org (AS6461) |
| foreThought.net (AS6653) |
| Blue Moon Online System (AS10259) |
| Tellurian Networks (AS10848) |
| Die.net (AS11051) |
| Easynews (AS11588) |
| INFLOW (AS13756/19290) |
| ARPNetworks (AS25795) |
| Steadfast Networks (AS32748) |
How to Read Traceroute Results
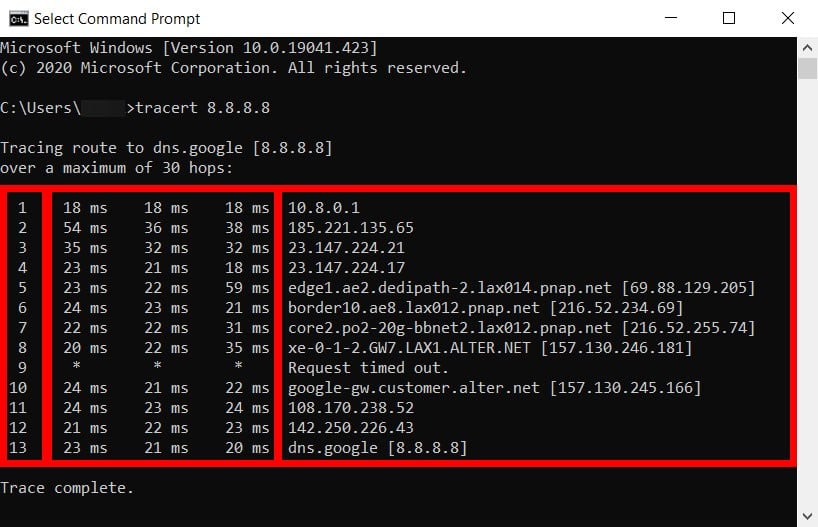
To read your traceroute results, look for the round trip time (RTT) in columns two through four. If you see any hops that took a long time or there is an error message in any of the rows, that might be where you have network connectivity problems.
How to Read the Traceroute Columns
- Column 1: This represents the hop number, or the number of hops that the three data packets were pushed through to reach the destination.
- Columns 2-4: These show the round trip time measured in milliseconds. RTT represents the time it took for a data packet to travel from the source to the destination and back again. To check for the consistency of the response times, the traceroute command sends three packets to each hop, which is why there are three time values listed per row. RTT values below 100 milliseconds are acceptable. However, if you see RTT values consistently increasing from the middle hop to the destination, it could be due to a network problem.
- Column 5: This column shows the name or IP address of the routers on every hop from your computer to the destination. It will also list the domain name of the router, if that information is available.
How to Read the Traceroute Rows
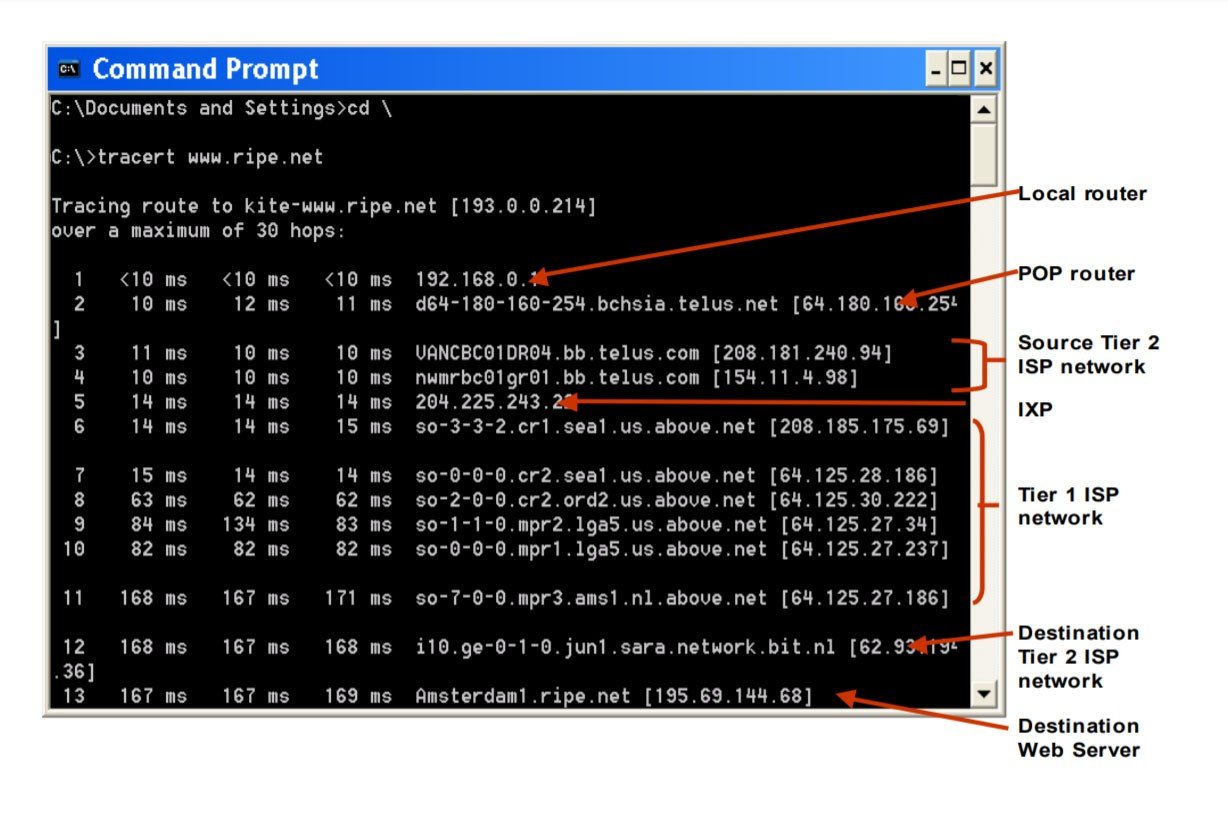
The traceroute results will show you the IP addresses for different points in the route. The addresses in the first few rows are from your source network, the middle hops are from internet service providers (ISPs), while the last ones are those near the destination.
- Local router. The first lines of the traceroute results will indicate your gateway’s IP address. In most cases, the first line will be your router’s IP address, which usually starts with 192.168.XXX.Xor 10.0.XXX.X. However, there are other router manufacturers that will have default IP addresses that start with other numbers. To find out which row your router is on, check out our guide on how to find your router’s IP address, and then compare it to your traceroute results.
- PoP router. A Point of Presence (PoP) is the local access point of your ISP. This access point helps your device establish a connection with the internet.
- Source Tier 2 ISP Network. Your request might be routed to a regional ISP (like Comcast or Cox), which services a limited geographic area. They pay Tier 1 providers for connectivity but also have agreements with other Tier 2 providers to exchange traffic directly. You might see your ISP provider’s name in lines three or four of the traceroute results.
- IXP. An Internet Exchange Point (IXP) is a physical location where ISPs and other network providers connect to exchange internet traffic. Here, administrators make routing decisions based on hop counts and other factors.
- Tier 1 ISP Network. These ISP providers are considered the backbone of the internet because they own the infrastructure to carry most of the traffic themselves. Tier 1 providers include AT&T, Sprint, and Verizon.
- Destination Tier 2 ISP Network. This is the regional ISP closest to the data packet’s destination and can appear in the second to the last line of the traceroute results.
- Destination Web Server. This is the last line in the traceroute results before the “Trace complete” message.
 (Image Source: NMSU.edu)
Ping vs Traceroute: In-Depth Traceroute Explanation
During a non-Traceroute test such as Ping, the TTL would start with any value between 1 and 255, which is usually defined differently depending on the Operating System.
Let’s say you ping the IP address 8.8.8.8, and your default TTL value is set to 51 hops.
Your packet will start with a “hop limit of 51” to avoid any further loop, and it will travel a maximum of 51 hops to reach its destination before it gets discarded.
Each router that comes in between the source and destination will reduce the TTL before sending it to the next router.
This reduction of TTL by -1 will happen across the entire path until the packet reaches its destination or the TTL value limit reaches, and the last hop sends an ICMP TTL Exceeded message.
To help visualize the Ping example…
Let’s send a ping with a limited TTL to 10.
This computer won’t be able to reach its destination, because there are more than ten hops towards server 8.8.8.8.
So, with this Ping, we are getting some valuable information from hop number 10, such as the IP 72.14.211.154 and additional data.
Summary
Although it is underestimated, Traceroute is one of the best OS-native network analytics tools. It is not only capable of testing connectivity, as Ping does, but it also finds all hops in between source and destination, including names, and delay times.
And all of this is done with the same protocol that Ping uses, ICMP. Also, by altering a field in the IP packet, the TTL.
Some software developers are even creating a front-end version of traceroute and including things such as GUIs, Geographical maps, graphs, etc. All to make a simple tool even more powerful.
But if you understand the basics and some of the tricks shown in this article, you probably won’t need fancy software.
Traceroute comes in all OS out there, from Linux, Windows, UNIX-based, to macOS.
The underlying functionality is the same, but remember that there are few command syntax and output distinctions.
traceroute Tools & tracert FAQs
What does a route issue mean?
A route issue means that there is a problem somewhere on the path to the destination device. Usually, if there is an issue with one of the routers on a path to a faraway place, the neighboring routers will know about the problem and route traffic around the faulty node. Route issues are more likely to happen on your own network and be caused by an error in a routing table.
What is the difference between Traceroute and Tracepath?
Traceroute is an older utility and tracepath was created as a slight improvement. The main difference between the two is that tracepath gives the MTU without it being specifically requested. The MTU is available in the output for traceroute, but you have to add on an extra option in order to get it. One other old difference between the two was that traceroute was only available to superusers on Unix/Linux. However, it is now available to any user just like tracepath.
Why is Traceroute so slow?
Traceroute takes a lot longer than Ping to report back on a path because traceroute reports back on each node. So, if you are tracing a path over three nodes, traceroute goes out to the first node then gets a response, then it goes out to the second node and waits for a response, then it goes out to the third node and then gets a response, then it goes to the destination and waits for a response. All of that waiting and repeated probing means that Traceroute has more work to do than Ping, which just sends a message to the destination and waits for a response.
Image credits:
Анализатор пути Pro
Следующий инструмент, который мы собираемся упомянуть, — это Path Analyzer Pro. Благодаря ему мы сможем отслеживать расширенные сетевые маршруты с помощью тестов производительности, DNS, Whois и разрешение сети для исследования сетевых проблем. Кроме того, он имеет простой графический интерфейс и доступен для Windows и Мак Операционные системы OS X.
Очень важной особенностью является то, что он до 20 раз быстрее, чем традиционный traceroute. Также заслуживает внимания его функция «синопсиса», благодаря которой нам не придется искать данные с пяти или десяти серверов Whois, регистраторов, маршрутизаторов и других источников, а затем сопоставлять их и получать сводную информацию
Если вы хотите скачать пробную версию программы, вы можете сделать это из здесь , если вам нравится самая базовая версия, она стоит 30 евро.
Tracert Parameters
| Parameter | Description |
|---|---|
| -d | Do not resolve addresses of intermediate routers to their hostnames. This can speed up tracert performance. |
| -h maximum_hops | Set the maximum number of hops in the path to search for target. Default is 30 hops. |
| -j host-list | Loose source route along host-list (IPv4-only). With loose source routing, successive intermediate destinations can be separated by one or more routers. The maximum number of addresses of names is the host list is nine (9). The hostlist is simply a series of IP addresses in dotted decimal notation (e.g., 192.168.128.8) each separated by spaces. This parameter is only for IPv4 addresses. |
| -w timeout | Set the amount of time (in milliseconds) to wait for each reply. |
| -R | Trace round-trip path (IPv6-only). |
| -S srcaddr | Source address to use (IPv6-only). |
| -4 | Force tracert to use IPv4 for the trace. |
| -6 | Force tracert to use IPv6 for the trace. |
| TargetName | Specifies the destination, either an IP address or a host name. |
| /? | Displays help information. |
Analyzing Tracert Results
Round Trip Times (RTT)
- RTT (latency) is the main thing you want to focus on in your tracert report. For these values, the lower the number, the better. You also want to see fairly consistent times for each hop.
- RTT above 150ms within the United States is considered to be long, but may be normal if the remote device is in the opposite side of the world.
- If an asterisk (*) appears for RTT instead of a time, this indicates that the packet was not received back within the expected time frame. For Windows tracert, the default is 4,000 milliseconds (or 4 seconds). This parameter can be increased by using the switch if necessary. Seeing one or two asterisks does not necessarily indicate a problem. Routers can be configured to limit the number of ping or tracert packets it responses to as a way to prevent them from being affected by denial-of-service attacks.
- If there are three asterisks followed by a Request Timed Out message, there can be a few reasons for this:
- If this appears at the beginning of a tracert report, it can be ignored as it is often due to the device configured to not respond to ping and tracert packets.
- If this appears toward the end of a tracert report, it can indicate one of the following:
- Firewall — A security device (such as a firewall) at the destination network is blocking the request. However, this does not mean the destination device is not reachable (such as a web server). This only indicates that a security device is configured to not response to ping or tracert packets.
- Problem with Return Path — As mentioned, RTT measures the round trip time a packet traverse from your computer to the router and back. The pathway to the hop is often not going to be same for the return trip.
- Problem with Remote Device — The remote device is not configured correctly or has system problems affecting your connection.
- A progressively increase in latency to the remote device can indicate an issue starting with the hop where the sudden increase began.
- A high latency in the middle of your tracert report does not necessarily indicate a problem as the associated router may have be configured to respond to ping and tracert packets with low priority.
- A high latency at the beginning of a tracert report (the first two hops) may indicate issues with your local network or Internet Service Provider (ISP). To resolve, contact the I.T. department of your organization or your ISP.
Синтаксис и основные ключи утилиты route
Теперь поговорим поподробней о команде route.
Общий синтаксис:
route
Основные ключи:
- -f — удаляет из таблицы маршрутизации все маршруты;
- -p – сохраняет маршрут на постоянную основу;
- add – добавляет новый маршрут;
- change — меняет текущий маршрут в таблице маршрутизации;
- delete — удаляет маршрут из таблицы маршрутизации;
- print — отображает содержимое таблицы маршрутизации;
- destination — при добавлении или изменении маршрута этот параметр используется для указания идентификатора сети назначения;
- mask — при добавлении или изменении маршрута этот параметр используется для указания маски подсети для сети назначения;
- gateway — при добавлении или изменении нового маршрута этот параметр используется для указания шлюза (маршрутизатора или модема);
- metric — используется для указания целого числа в диапазоне от 1 до 9999, являющегося метрикой стоимости для маршрута. Если для определенной сети назначения существует несколько возможных маршрутов, будет использован маршрут с наименьшим значением метрики;
- if — используется для указания номера индекса интерфейса, который подключен к сети назначения.
Для того чтобы просто посмотреть таблицу маршрутизации у себя на компьютере введите в командную строку следующие:
route print
Вот в принципе и все что я хотел Вам рассказать, но следует помнить что, проводя все выше указанные манипуляции нужно быть внимательным, так как ошибка всего в одной цифре приведет к нежелательным результатам, не критичным, но нежелательным. В особенности это относится к корпоративным сетям, где маршрутизация уже настроена, и Вы можете легко изменить, удалить нужные маршруты.