Sql insert into: примеры вставки строк в таблицу бд mysql
Содержание:
- Parameters
- INSERT…SELECT statement
- SQL Учебник
- Синтаксис
- Insert one row into a table
- INSERT INTO TABLE using Excel
- Rules:
- How to use an Insert into statement to add data with default values
- Оператор SELECT
- Demo Database
- Приоритет вставки INSERT LOW_PRIORITY / HIGH_PRIORITY
- Часто задаваемые вопросы
- Как вставить значение из другой таблицы INSERT INTO … SELECT …
- Запрос на вставку строки
- Демо база данных
- SQL INSERT INTO
- SQL Server INSERT statement examples
- Which Method is Best?
- Активация переключения режимов вставки и замены кнопкой Insert в Ворде
- Практическое упражнение № 2:
- SQL Учебник
- Table of contents
- Example — Using VALUES keyword
Parameters
|
One or both of the following hints:
|
|
|
Specifies a schema, by default . If schema is any schema other than , you must supply the schema name. For example: myschema.thisDbObject If you specify a database, it must be the current database. |
|
|
The target table. You cannot invoke on a projection. This can be a flex table. |
|
|
A comma-delimited list of one or more target columns in this table, listed in any order. clause values are mapped to columns in the same order. If you omit this list, Vertica maps clause values to columns according to column order in the table definition. A list of target columns is invalid with . |
|
|
Fills all columns with their default values as specified in the table definition. You cannot specify a list of target columns with this option. |
|
|
A comma-delimited list of one or more values to insert in the target columns, where each value is one of the following:
If no value is supplied for a column, Vertica implicitly adds a value, if defined. Otherwise Vertica inserts a value. If the column is defined as , returns an error. |
|
|
Specifies a query that returns the rows to insert. Isolation level applies only to the clauses and works like any query. |
INSERT…SELECT statement
The first SQL INSERT statement uses an INSERT…SELECT statement to derive the output from the multiple source tables such as Employee, EmployeePayHistory, Department, and Person of the AdventureWorks2014 database and insert the result set into the demo table.
You can see that schema and definition is already built for the INSERT INTO SQL statement.
|
1 |
CREATETABLEDemo (FirstNameVARCHAR(25), LastNameVARCHAR(25), JobTitleVARCHAR(100), RateDECIMAL(7,4), GroupNameVARCHAR(50) ); INSERTINTODemo SELECTP.FirstName, P.LastName, EMP.JobTitle, EPH.Rate, Dept.GroupName FROMHumanResources.EmployeePayHistoryEPH INNERJOINHumanResources.EmployeeEMPONEMP.BusinessEntityID=EPH.BusinessEntityID INNERJOINHumanResources.EmployeeDepartmentHistoryHONEMP.BusinessEntityID=H.BusinessEntityID INNERJOINHumanResources.DepartmentDeptONH.DepartmentID=Dept.DepartmentID INNERJOINPerson.PersonPONP.BusinessEntityID=EMP.BusinessEntityID WHEREDept.GroupName=’Research and Development’; SELECT* FROMDemo; |
SQL Учебник
SQL ГлавнаяSQL ВведениеSQL СинтаксисSQL SELECTSQL SELECT DISTINCTSQL WHERESQL AND, OR, NOTSQL ORDER BYSQL INSERT INTOSQL Значение NullSQL Инструкция UPDATESQL Инструкция DELETESQL SELECT TOPSQL MIN() и MAX()SQL COUNT(), AVG() и …SQL Оператор LIKESQL ПодстановочныйSQL Оператор INSQL Оператор BETWEENSQL ПсевдонимыSQL JOINSQL JOIN ВнутриSQL JOIN СлеваSQL JOIN СправаSQL JOIN ПолноеSQL JOIN СамSQL Оператор UNIONSQL GROUP BYSQL HAVINGSQL Оператор ExistsSQL Операторы Any, AllSQL SELECT INTOSQL INSERT INTO SELECTSQL Инструкция CASESQL Функции NULLSQL ХранимаяSQL Комментарии
Синтаксис
Синтаксис Oracle оператора INSERT при вставке одной записи с помощью ключевого слова VALUES:
INSERT INTO table
(column1, column2, … column_n )
VALUES
(expression1, expression2, … expression_n );
ИЛИ синтаксис Oracle оператора INSERT при вставке нескольких записей с помощью оператора SELECT:
INSERT INTO table
(column1, column2, … column_n )
SELECT expression1, expression2, … expression_n
FROM source_table
;
Параметры или аргументы
table
Таблица для вставки в нее записей.
column1, column2, … column_n
Столбцы таблицы для вставки значений
expression1, expression2, … expression_n
Значения для столбцов таблицы. Так column1 будет присвоено значение expression1, column2 будет присвоено значение expression2, и так далее.
source_table
Исходная таблица из которой будут вставляться данные.
WHERE conditions
Необязательный. Условия, которые должны быть выполнены для вставляемых записей.
Примечание
- При вставке записей в таблицу с помощью оператора Oracle INSERT, необходимо указать значение NOT NULL для каждого столбца.
- Вы можете опустить столбец из Oracle оператора INSERT, если столбец принимает NULL значения.
Insert one row into a table
To insert one row into a table, you use the following syntax of the statement.
There are some points that you should pay attention to when you insert a new row into a table:
- First, the number of values must be the same as the number of columns. In addition, the columns and values must be the correspondent because the database system will match them by their relative positions in the lists.
- Second, before adding a new row, the database system checks for all integrity constraints e.g., foreign key constraint, primary key constraint, check constraint and not null constraint. If one of these constraints is violated, the database system will issue an error and terminate the statement without inserting any new row into the table.
It is not necessary to specify the columns if the sequence of values matches the order of the columns in the table. See the following statement that omits the column list in the clause.
However, this is not considering as a good practice.
If you don’t specify a column and its value in the statement when you insert a new row, that column will take a default value specified in the table structure. The default value could be 0, a next integer value in a sequence, the current time, a NULL value, etc. See the following statement:
In this syntax, the will take a default value.
Insert one row into a table example
We will use the and tables in the sample database to show you how to insert one row into the table.
To insert a new row into the table.
We did not use the column in the statement because the column is an auto-increment column, therefore, the database system uses the next integer number as the default value when you insert a new row.
The column is a foreign key that links the table to the table. Before adding the new rows, the database system checks if the value 178 exists in the column of the table to make sure that the foreign key constraint is not violated.
If the row is inserted successfully, the database system returned the number of the affected rows.
You can check whether the row has been inserted successfully or not by using the following SELECT statement.
INSERT INTO TABLE using Excel
In many cases, you’ll need to run multiple SQL statements based on the dataset provided to you. This stands not only for the INSERT INTO TABLE statement but also for UPDATE and DELETE statements. There is no point in typing these statements manually, but you should rather go with a smarter approach – prepare formulas (or a script) that will automate this part. In such situations, I prefer using Excel and formulas.
Note: Personally, in the context of databases, I find Excel very useful when I need to create multiple statements and when presenting results and/or creating dashboards.
Let’s take a look at these formulas:

The formula used to insert the first country (Germany) is:
| 1 | =»INSERTINTOcountry (country_name,country_name_eng,country_code)VALUES(‘» & B2 & «‘,'» & C2 & «‘,'» & D2 & «‘);» |

The formula used to insert the first city (Berlin) is:
| 1 | =»INSERTINTOcity (city_name,lat,long,country_id)VALUES(‘» & B2 & «‘,»&C2&»,»&D2&»,»&E2&»);» |
Feel free to use these formulas to automate your tasks. We’ll use a similar approach later when we are running multiple UPDATE and DELETE statements (and even when creating SELECT statements).
Rules:
- Typically we don’t always provide data for every single column. In some cases, the columns can be left blank and in some other provide their own default values.
- You also have situations where some columns are automatically generating keys. In such cases, you certainly don’t want to try and insert your own values in those situations.
- The columns and values must match order, data type and number
- If the column is of strings or date time or characters, they need to be enclosed in the in the single quotes. If they’re numeric, you don’t need the quotes.
- If you do not list your target columns in the insert statement then you must insert values into all of the columns in the table, also, be sure to maintain the order of the values
How to use an Insert into statement to add data with default values
Let us create a simple table for the demonstration. A table is created with integer column defined with default value 0 and another DateTime column defined with the default date timestamp value.
|
1 |
CREATETABLEdemo (idINTDEFAULT, hirdateDATETIMEDEFAULTGETDATE() ); |
Now, let us insert default value into the table Demo using a SQL insert into statement
|
1 |
INSERTINTOdemo DEFAULTVALUES; SELECT* FROMdemo; |
Note: If all the columns of the table defined with default values then specify the DEFAULT VALUES clause to create a new row with all default values
Next, override the default values of the table with a SQL Insert into statement.
|
1 |
INSERTINTOdemo VALUES(1,’2018-09-28 08:49:00′) SELECT* FROMdemo; |
Let us consider another example where the table is a combination of both default and non-default columns.
|
1 |
DROPTABLEIFEXISTSDemo; CREATETABLEdemo (idINT PRIMARYKEYIDENTITY(1,1), NameVARCHAR(20), hirdateDATETIMEDEFAULTGETDATE() ); |
In order to insert default values to the columns, you just need exclude the default columns from the insert list with a SQL insert into statement.
|
1 |
INSERTINTOdemo (name) VALUES(‘Prashanth’),(‘Brian’),(‘Ahmad’); SELECT* FROMdemo; |
The following example you can see that the keyword DEFAULT is used to feed a value to the table in the values clause with a SQL Insert into statement
|
1 |
INSERTINTOdemo(name,hirdate) VALUES(‘Kiki’,DEFAULT),(‘Yanna’,DEFAULT),(‘Maya’,DEFAULT); |
Оператор SELECT
Оператор является наиболее часто используемым оператором SQL (и также называется проекцией — projection). Он позволяет извлекать все или некоторые данные из таблицы на основе определенных критериев.
Проще всего оператор выглядит, когда применяется для извлечения всех данных таблицы:
SQL> SELECT * FROM employees;
Для извлечения только определенных столбцов необходимо указывать имена этих столбцов после ключевого слова , например:
SQL> SELECT first_name, last_name, hiredate FROM employees;
При желании извлечь только первых десять строк таблицы можно использовать оператор следующим образом:
SQL> SELECT * FROM employees WHERE rownum <11;
Если требуется узнать только о том, какое количество строк содержится в таблице, оператор применяется так:
SQL> SELECT COUNT(*) FROM employees;
Если в таблице присутствуют дубликаты, можно использовать в операторе конструкцию для исключения дублированных значений, как показано ниже:
SQL> SELECT DISTINCT username FROM V$SESSION;
С помощью необязательной конструкции в операторе можно задавать различные условия и тем самым обеспечивать возврат только определенных строк. В таблице А.1 перечислены некоторые наиболее типичные условия, которые можно указывать в конструкции.
| Символ | Условие |
| Равно | |
| Больше | |
| Меньше | |
| Меньше или равно | |
| Больше или равно | |
| Не равно |
Ниже приведено несколько примеров применения конструкции :
SQL> SELECT employee_id WHERE salary = 50000;
SQL> SELECT employee_id WHERE salary < 50000;
SQL> SELECT employee_id WHERE salary > 50000;
SQL> SELECT employee_id WHERE salary <= 50000;
SQL> SELECT employee_id WHERE salary >= 50000;
SQL> SELECT employee_id WHERE salary ! 50000;
Условие LIKE
Условие позволяет ограничивать количество возвращаемых оператором строк за счет применения операции сопоставления с образцом. Ниже приведен пример использования этого условия:
SQL> SELECT employee_id, last_name FROM employees
2* WHERE last_name LIKE 'Fa%';
EMPLOYEE_ID  LAST_NAME
-----------  ----------
109          Faviet
202          Fay
SQL>
Образец, с которым должно выполняться сопоставление, должен быть заключен в одинарные кавычки (). В приведенном выше примере знак процента () обозначает, что за буквами может идти любая строка символов. То есть знак процента выступает в роли группового символа, способного замещать один или более символов, и, по сути, делает то же самое, что во многих операционных системах делает символ звездочки ()
Важно обратить внимание на то, что один символ подчеркивания () тоже может выступать групповым символом, но в отличие от знака процента способен замещать только один символ
Demo Database
In this tutorial we will use the well-known Northwind sample database.
Below is a selection from the «Customers» table:
| CustomerID | CustomerName | ContactName | Address | City | PostalCode | Country |
|---|---|---|---|---|---|---|
| 1 | Alfreds Futterkiste | Maria Anders | Obere Str. 57 | Berlin | 12209 | Germany |
| 2 | Ana Trujillo Emparedados y helados | Ana Trujillo | Avda. de la Constitución 2222 | México D.F. | 05021 | Mexico |
| 3 | Antonio Moreno Taquería | Antonio Moreno | Mataderos 2312 | México D.F. | 05023 | Mexico |
And a selection from the «Suppliers» table:
| SupplierID | SupplierName | ContactName | Address | City | Postal Code | Country |
|---|---|---|---|---|---|---|
| 1 | Exotic Liquid | Charlotte Cooper | 49 Gilbert St. | Londona | EC1 4SD | UK |
| 2 | New Orleans Cajun Delights | Shelley Burke | P.O. Box 78934 | New Orleans | 70117 | USA |
| 3 | Grandma Kelly’s Homestead | Regina Murphy | 707 Oxford Rd. | Ann Arbor | 48104 | USA |
Приоритет вставки INSERT LOW_PRIORITY / HIGH_PRIORITY
Установление приоритета нужно для решение проблем с конкурентными вставками. При вставках происходит блокировка строк и если 2 INSERT запроса требуют блокировки одних и тех же строк, для своего выполнения, то иногда может потребоваться повысить или понизить приоритет некоторых запросов, по отношению к другим. Это можно сделать указав приоритет LOW_PRIORITY или HIGH_PRIORITY
Наш запрос будет выглядеть так для LOW_PRIORITY:
INSERT LOW_PRIORITY INTO table1 (a, b, c) VALUES(1, 2, 3);
HIGH_PRIORITY:
INSERT HIGH_PRIORITY INTO table1 (a, b, c) VALUES(1, 2, 3);
Помогла ли Вам эта статья?
Да
Нет
Часто задаваемые вопросы
Вопрос: Я создал базу данных клиентов. Я знаю, что вы используете Oracle оператор INSERT для вставки информации в базу данных, но как я могу убедиться, что не ввел ту же информацию о клиенте снова?
Ответ: Вы можете убедиться, что не вставить повторяющуюся информацию, используя условие EXISTS.
Например, если у вас была таблица с названием clients с первичным ключом client_id, вы можете использовать следующий INSERT:
Oracle PL/SQL
INSERT INTO clients
(client_id, client_name, client_type)
SELECT supplier_id, supplier_name, ‘advertising’
FROM suppliers
WHERE NOT EXISTS (SELECT *
FROM clients
WHERE clients.client_id = suppliers.supplier_id);
|
1 |
INSERTINTOclients SELECTsupplier_id,supplier_name,’advertising’ FROMsuppliers WHERENOTEXISTS(SELECT* FROMclients WHEREclients.client_id=suppliers.supplier_id); |
Это Oracle предложение INSERT вставляет несколько записей с подзапросом.
Если вы хотите вставить одну запись, вы можете использовать следующее Oracle предложение INSERT:
Oracle PL/SQL
INSERT INTO clients
(client_id, client_name, client_type)
SELECT 10345,
‘IBM’,
‘advertising’
FROM dual
WHERE NOT EXISTS (SELECT *
FROM clients
WHERE clients.client_id = 10345);
|
1 |
INSERTINTOclients SELECT10345, ‘IBM’, ‘advertising’ FROMdual WHERENOTEXISTS(SELECT* FROMclients WHEREclients.client_id=10345); |
Использование таблицы dual позволяет ввести значения в операторе select, даже если значения не хранятся в настоящее время в таблице.
Вопрос: Как я могу вставить несколько строк явных данных в одном предложении INSERT в Oracle?
Ответ: Ниже приведен пример того, как можно вставить 3 строки в таблицу suppliers в Oracle, используя оператор INSERT:
Oracle PL/SQL
INSERT ALL
INTO suppliers (supplier_id, supplier_name) VALUES (1000, ‘IBM’)
INTO suppliers (supplier_id, supplier_name) VALUES (2000, ‘Microsoft’)
INTO suppliers (supplier_id, supplier_name) VALUES (3000, ‘Google’)
SELECT * FROM dual;
|
1 |
INSERTALL INTOsuppliers(supplier_id,supplier_name)VALUES(1000,’IBM’) INTOsuppliers(supplier_id,supplier_name)VALUES(2000,’Microsoft’) INTOsuppliers(supplier_id,supplier_name)VALUES(3000,’Google’) SELECT*FROMdual; |
Как вставить значение из другой таблицы INSERT INTO … SELECT …
Допустим у нас есть еще одна таблица которая по структуре точно такая же как и первая. Нам в таблицу table2 нужно вставить все строки из table1.
Вставляем значения из table1 в таблицу table2:
INSERT INTO table2 (a, b, c) SELECT a, b, c FROM table1;
Вам следует позаботиться об уникальности ключей, если они есть в таблице, в которую мы вставляем. Например при дублировании PRIMARY KEY мы получим следующее сообщение об ошибке:
/* ERROR 1062 (23000): Duplicate entry '100' for key 'PRIMARY' */
Если вы делаете не какую-то единичную вставку при переносе данных, а где-то сохраните этот запрос, например в вашем PHP скрипте, то всегда перечисляйте столбцы.
Как не рекомендуется делать (без перечисления столбцов):
INSERT INTO table2 SELECT * FROM table1;
Если у вас со временем изменится количество столбцов в таблице, то запрос перестанет работать. При выполнении запроса MySQL в лучшем случае просто будет возвращать ошибку:
/* Ошибка SQL (1136): Column count doesn't match value count at row 1 */
Либо еще хуже: значения вставятся не в те столбцы.
Запрос на вставку строки
Простой запрос, который вставляет строку со столбцами 111, 222 и 333 выглядит так:
INSERT INTO table1 (a, b, c) VALUES (111, 222, 333);
Еще один способ сделать то же самое:
INSERT INTO table1 SET a=111, b=222, c=333;
Столбцы, которые вы не перечислите заполняются значениями по умолчанию, которые вы предусматриваете при создании таблицы, даже если это просто NULL.
У таблиц обычно есть поле с первичным ключом (PRIMARY KEY) таблицы. Если этому полю установлено значение AUTOINCREMENT т.е. оно заполняется автоматически, то в таком случае вы не должны его перечислять в списке столбцов оператора INSERT.
Вставка без перечисления столбцов
Если количество значений, которые мы вставляем = количеству столбцов в таблице, то можно не перечислять столбцы, и наш запрос может выглядеть так:
INSERT INTO table1 VALUES (111, 222, 333);
Этот способ крайне не рекомендуется. Дело в том, что со временем вы можете менять таблицы, например добавлять в них новые столбцы, а это значит, что все запросы записанные таким способом просто перестанут работать и вам придется менять их по всему вашему приложению.
Поэтому, навсегда забываем этот способ. Я его привел, только чтобы вы так не делали.
Демо база данных
В этом уроке мы будем использовать хорошо известный пример базы данных Northwind.
Ниже приведен выбор из таблицы «Customers»:
| CustomerID | CustomerName | ContactName | Address | City | PostalCode | Country |
|---|---|---|---|---|---|---|
| 1 | Alfreds Futterkiste | Maria Anders | Obere Str. 57 | Berlin | 12209 | Germany |
| 2 | Ana Trujillo Emparedados y helados | Ana Trujillo | Avda. de la Constitución 2222 | México D.F. | 05021 | Mexico |
| 3 | Antonio Moreno Taquería | Antonio Moreno | Mataderos 2312 | México D.F. | 05023 | Mexico |
И выбор из таблицы «Suppliers»:
| SupplierID | SupplierName | ContactName | Address | City | Postal Code | Country |
|---|---|---|---|---|---|---|
| 1 | Exotic Liquid | Charlotte Cooper | 49 Gilbert St. | Londona | EC1 4SD | UK |
| 2 | New Orleans Cajun Delights | Shelley Burke | P.O. Box 78934 | New Orleans | 70117 | USA |
| 3 | Grandma Kelly’s Homestead | Regina Murphy | 707 Oxford Rd. | Ann Arbor | 48104 | USA |
SQL INSERT INTO
Инструкция INSERT INTO используется для вставки новых записей в таблицу.
Синтаксис INSERT INTO
Написать инструкцию INSERT INTO можно двумя способами.
Первый способ определяет как имена столбцов, так и значения, которые будут вставлены:
INSERT INTO table_name (column1, column2, column3, …)
VALUES (value1, value2, value3, …);
Если вы добавляете значения для всех столбцов таблицы, вам не нужно указывать имена столбцов в SQL запросе.
Однако убедитесь, что порядок значений находится в том же порядке, что и столбцы в таблице.
Синтаксис INSERT INTO будет выглядеть следующим образом:
INSERT INTO table_name
VALUES (value1, value2, value3, …);
SQL Server INSERT statement examples
Let’s create a new table named for the demonstration:
In this statement, we created a new table named in the schema. The table has five columns including promotion identification number, name, discount, start date and expired date.
The promotion identification number is an identity column so its value is automatically populated by the SQL Server when you add a new row to the table.
1) Basic example
The following statement inserts a new row into the table:
In this example, we specified values for four columns in the table. We did not specify a value for the column because SQL Server provides the value for this column automatically.
If the statement executes successfully, you will get the number of rows inserted. In this case, SQL Server issued the following message:
To verify the insert operation, you use the following query:
Here is the result as you expected.
2) Insert and return inserted values
To capture the inserted values, you use the clause. For example, the following statement inserts a new row into the table and returns the inserted value of the column:
To capture inserted values from multiple columns, you specify the columns in the output as shown in the following statement:
The following is the output:
3) Insert explicit values into the identity column
Typically, you don’t specify a value for the identity column because SQL Server will provide the value automatically.
However, in some situations, you may want to insert a value into the identity column such as data migration.
See the following statement:
SQL Server issued the following error:
To insert explicit value for the identity column, you must execute the following statement first:
To switch the identity insert off, you use the similar statement:
Let’s execute the following statements to insert a value for the identity column in the table:
In this example, first, we switched the identity insert on, then inserted a row with an explicit value for the identity column, and finally switched the identity insert off.
The following shows the data of the table after the insertion:
In this tutorial, you have learned how to use the SQL Server statement to add a new row to a table.
Which Method is Best?
With a variety of methods to insert data into SQL Server available, the first question we will ask is which syntax should we use? The answer is going to depend on your use-case and specifically what is most important to a given application. To summarize our work so far:
Use an INSERT with an explicit column list for applications where column lists, inputs, and outputs do not change often. These are scenarios where change typically consist of column additions or alterations resulting from software releases. The column lists also add a layer of protection against logical errors if a column is added, removed, or altered without the INSERT statement also being updated. An error being thrown is a far better outcome than data quietly being handled incorrectly. This syntax is generally considered a best practice as it provides both documentation and protection against inadvertent mistakes should the schema change in the future.
An INSERT with no column list carves out a niche in scenarios where the columns are unknown or frequently changing. This might be useful in ETL, reporting, or scenarios involving transient data when the data is unstructured. Despite that possible application, I would lean towards using SELECT INTO for these applications as they provide a bit more safety against inadvertent mistakes with your data. An alternative to cover the need to insert into a pre-existing table would be to use SELECT INTO to create a temporary data structure and then insert from that temporary data into the permanent table using a formal column list.
SELECT INTO provides us the ability to quickly create a new table and dump data into it with very little setup or coding. For small data sets or those that are going to be scanned in their entirety, this is a great way to move data with minimal TSQL and maintenance. The primary downside is the inability to include indexes or constraints on the table until after it is created. This syntax must create a new table, which lends itself towards using temporary tables as a target to insert data to.
OUTPUT INSERTED allows us to return data from before, after, or before and after a DML statement. This is a hugely useful syntax and one that has no intrinsic downsides. It is a great alternative to iteration, functions, or triggers that may attempt to accomplish the same tasks. The syntax is relatively simple and can be applied to any data elements prior to or after a given change. You may even include data that is not directly affected by a DML statement, but was joined for use in the query!
Активация переключения режимов вставки и замены кнопкой Insert в Ворде
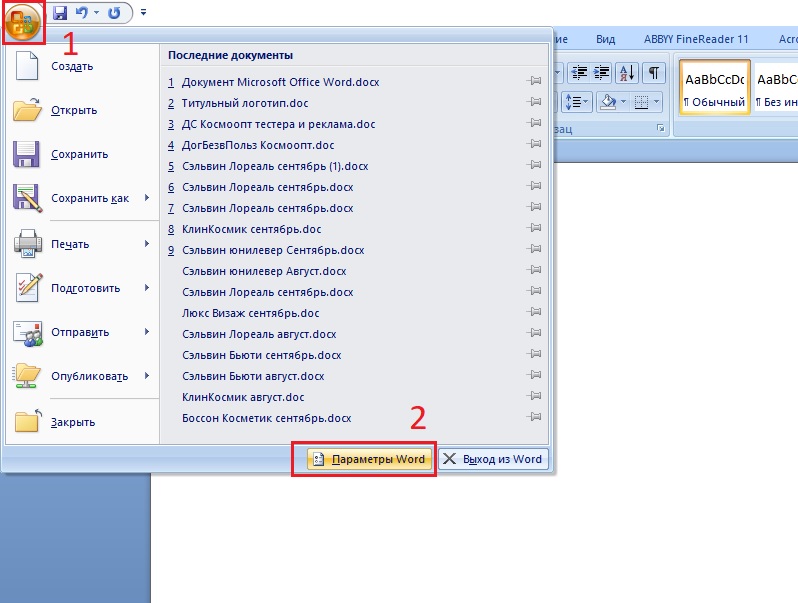
Для начала заходим в настройки Word. Делается это нажатием на кнопку в верхнем левом углу (кнопка «Файл») и в появившемся меню выбором пункта «параметры (параметры word)».
Вход в параметры Word 2007

Вход в параметры Word 2013

Вход в параметры Word 2013
В открывшемся окне настроек нужно перейти на вкладку «Дополнительно».
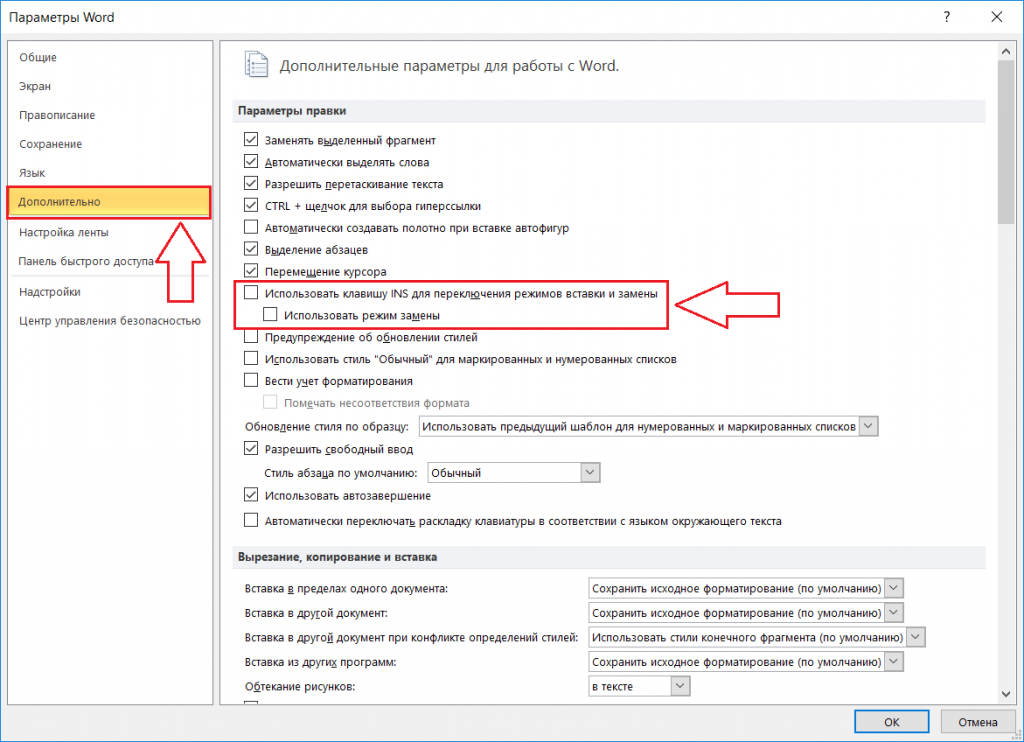
Включение смены режимов замены и вставки кнопкой insert в ворде
В правой части окна появятся различные пункты настроек. Среди них нужно найти «Использовать клавишу INS для переключения режимов вставки и замены». Включаем его установкой галочки напротив.
Остается лишь нажать «ок» в низу окна для применения настроек.
Теперь клавишей Insert на клавиатуре вы можете включать и отключать режим замены в Microsoft Word.
На большинстве современных периферийных систем ввода есть клавиша Insert. Она может использоваться как единично, так и в сочетании с другими кнопками на клавиатуре. Также ее назначение может изменяться в зависимости от того, какое программное обеспечение запущено на персональном компьютере в текущий момент. Именно особенностям использования этого элемента устройства и будет посвящен небольшой предлагаемый вашему вниманию обзор.
Практическое упражнение № 2:
На основании таблицы contacts и customers, вставить в таблицу contacts всех customers, которые проживают в штате Nevada.
Oracle PL/SQL
—создаем contacts
CREATE TABLE contacts
( contact_id number(10) not null,
last_name varchar2(50) not null,
first_name varchar2(50) not null,
address varchar2(50),
city varchar2(50),
state varchar2(20),
zip_code varchar2(10),
CONSTRAINT contacts_pk PRIMARY KEY (contact_id)
);
—создаем customers
CREATE TABLE customers
( customer_id number(10) not null,
last_name varchar2(50) not null,
first_name varchar2(50) not null,
address varchar2(50),
city varchar2(50),
state varchar2(20),
zip_code varchar2(10),
CONSTRAINT customers_pk PRIMARY KEY (customer_id)
);
|
1 |
—создаем contacts CREATETABLEcontacts last_namevarchar2(50)notnull, first_namevarchar2(50)notnull, addressvarchar2(50), cityvarchar2(50), statevarchar2(20), zip_codevarchar2(10), CONSTRAINTcontacts_pkPRIMARYKEY(contact_id) CREATETABLEcustomers last_namevarchar2(50)notnull, first_namevarchar2(50)notnull, addressvarchar2(50), cityvarchar2(50), statevarchar2(20), zip_codevarchar2(10), CONSTRAINTcustomers_pkPRIMARYKEY(customer_id) |
Решение для практического упражнения № 2:
Следующий оператор Oracle INSERT вставит запись в таблицу customers:
Oracle PL/SQL
INSERT INTO contacts
(contact_id, last_name, first_name, address, city, state, zip_code)
SELECT customer_id,
last_name,
first_name,
address,
city,
state,
zip_code
FROM customers
WHERE state = ‘Nevada’;
|
1 |
INSERTINTOcontacts SELECTcustomer_id, last_name, first_name, address, city, state, zip_code FROMcustomers WHEREstate=’Nevada’; |
Так как количество полей в таблицах contacts и customers одинаковы и поля перечислены в том же порядке, то вы могли бы записать решение следующим образом (хотя это, как правило, лучшая практика, перечислить весь список имен столбцов в случае изменения определения таблицы):
Oracle PL/SQL
INSERT INTO contacts
SELECT *
FROM customers
WHERE state = ‘Nevada’;
|
1 |
INSERTINTOcontacts SELECT* FROMcustomers WHEREstate=’Nevada’; |
SQL Учебник
SQL ГлавнаяSQL ВведениеSQL СинтаксисSQL SELECTSQL SELECT DISTINCTSQL WHERESQL AND, OR, NOTSQL ORDER BYSQL INSERT INTOSQL Значение NullSQL Инструкция UPDATESQL Инструкция DELETESQL SELECT TOPSQL MIN() и MAX()SQL COUNT(), AVG() и …SQL Оператор LIKESQL ПодстановочныйSQL Оператор INSQL Оператор BETWEENSQL ПсевдонимыSQL JOINSQL JOIN ВнутриSQL JOIN СлеваSQL JOIN СправаSQL JOIN ПолноеSQL JOIN СамSQL Оператор UNIONSQL GROUP BYSQL HAVINGSQL Оператор ExistsSQL Операторы Any, AllSQL SELECT INTOSQL INSERT INTO SELECTSQL Инструкция CASESQL Функции NULLSQL ХранимаяSQL Комментарии
Table of contents
| Learn SQL: CREATE DATABASE & CREATE TABLE Operations | |
| Learn SQL: INSERT INTO TABLE | |
| Learn SQL: Primary Key | |
| Learn SQL: Foreign Key | |
| Learn SQL: SELECT statement | |
| Learn SQL: INNER JOIN vs LEFT JOIN | |
| Learn SQL: SQL Scripts | |
| Learn SQL: Types of relations | |
| Learn SQL: Join multiple tables | |
| Learn SQL: Aggregate Functions | |
| Learn SQL: How to Write a Complex SELECT Query | |
| Learn SQL: The INFORMATION_SCHEMA Database | |
| Learn SQL: SQL Data Types | |
| Learn SQL: Set Theory | |
| Learn SQL: User-Defined Functions | |
| Learn SQL: User-Defined Stored Procedures | |
| Learn SQL: SQL Views | |
| Learn SQL: SQL Triggers | |
| Learn SQL: Practice SQL Queries | |
| Learn SQL: SQL Query examples | |
| Learn SQL: Create a report manually using SQL queries | |
| Learn SQL: SQL Server date and time functions | |
| Learn SQL: Create SQL Server reports using date and time functions | |
| Learn SQL: SQL Server Pivot Tables | |
| Learn SQL: SQL Server export to Excel | |
| Learn SQL: Intro to SQL Server loops | |
| Learn SQL: SQL Server Cursors | |
| Learn SQL: SQL Best Practices for Deleting and Updating data | |
| Learn SQL: Naming Conventions | |
| Learn SQL: SQL-Related Jobs | |
| Learn SQL: Non-Equi Joins in SQL Server | |
| Learn SQL: SQL Injection | |
| Learn SQL: Dynamic SQL | |
| Learn SQL: How to prevent SQL Injection attacks |
Example — Using VALUES keyword
The simplest way to create a SQL Server INSERT query to list the values using the VALUES keyword.
For example:
INSERT INTO employees
(employee_id, last_name, first_name)
VALUES
(10, 'Anderson', 'Sarah');
This SQL Server INSERT statement would result in one record being inserted into the employees table. This new record would have an employee_id of 10, a last_name of ‘Anderson’, and a first_name of ‘Sarah’.
You can also use this syntax to insert more than one record at a time. For example:
INSERT INTO employees
(employee_id, last_name, first_name)
VALUES
(10, 'Anderson', 'Sarah'),
(11, 'Johnson', 'Dale');
This INSERT example shows how to insert more than one record using the VALUES keyword. In this example, two records are inserted into the employees table. The first record has an employee_id of 10, a last_name of ‘Anderson’, and a first_name of ‘Sarah’. The second record has an employee_id of 11, a last_name of ‘Johnson’, and a first_name of ‘Dale’.
This would be equivalent to the following two INSERT statements: